所有动态
- 昨天
-
 You are using PHP version 8.4.19. Supported PHP versions are 8.1, 8.2 or 8.3 (8.2 or 8.3 recommended). You should contact your hosting provider or system administrator to update your PHP version. 使用 PHP 8.4,已经不能升级 Invision Community 论坛,需要降级到 PHP 8.3
 -
You are using PHP version 8.4.19. Supported PHP versions are 8.1, 8.2 or 8.3 (8.2 or 8.3 recommended). You should contact your hosting provider or system administrator to update your PHP version. 使用 PHP 8.4,已經不能升級 Invision Community 論壇,需要降級到 PHP 8.3
- 前几天
-
-

-
 HAPPY Games注册了
 -
目前為止我還是用免費版AI 總得來說很好用,直接把幾年前需要去搜尋引擎花時間找答案的觀念改掉 雖然我與AI問答過程中,有時候AI顯示正在搜尋網站網頁中,有時候停住變慢了 也有免費版的原因而無額度,需要等待幾個小時後才能再使用 當然AI也有一本正經的帶錯方向、給錯答案細節的時候 至少以前 "有問題就去搜尋引擎找答案" 的觀念,要替換為 "有問題要去問AI" 了 還要學習如何與AI對話的技巧與關鍵字,對話技巧變為重點方向 DeepSeek https://chat.deepseek.com Claude https://claude.ai Gemini https://gemini.google.com Copilot https://copilot.microsoft.com Chatgpt https://chatgpt.com
-
多数原因跟AI热门起来有关 很多事情不必在搜索引擎找答案 直接问AI就能出现答案
-
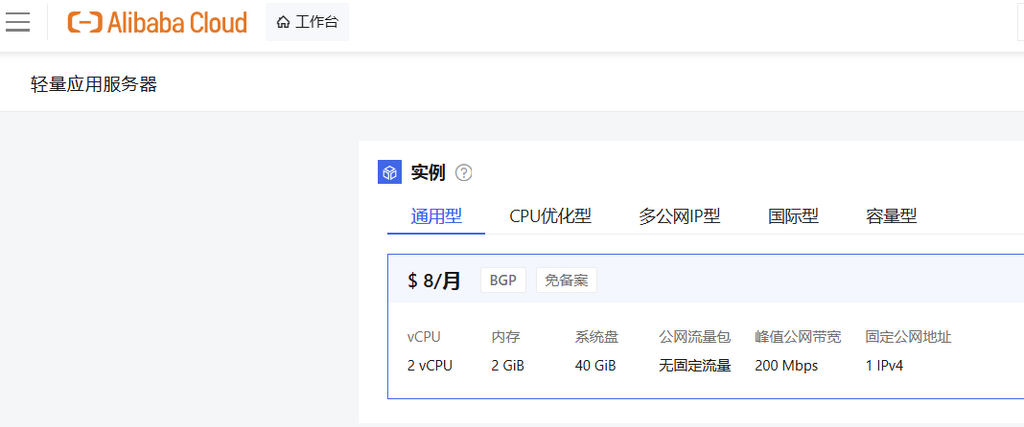
测速 阿里云 轻量 HK 2C/2G 带宽200M 通用型 BGP 每月8刀 近一年来,注册会员数持续下滑,帖子数严重下滑,是既定事实了 看来不必坚持使用中国优化线路 (虽然是小小优化线路) 下次换便宜的国际线路的云主机,能稳定运行就好
- 之前的
-
 Moses2446注册了
 -
防火牆規則腳本(新修改版) 與 IP轉發 (VPS的私有IP) 的情況
-
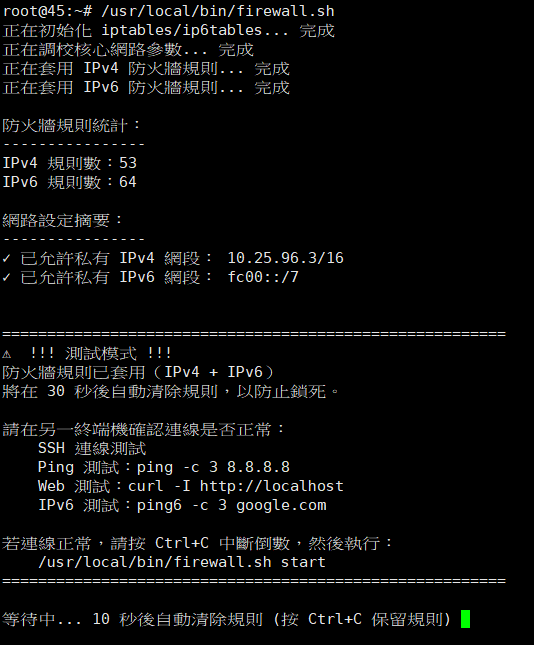
Debian 13防火牆建置:iptables (nf_tables backend) IPv4/IPv6 雙棧防護、Fail2ban入侵防護、Systemd開機自動啟動 ****************************************************************************************** Fail2ban Part 1 Fail2ban暫時只設定SSH防護,等待LNMP服務都安裝配置完畢,再回來增加 監獄 (Jail) 設定 ****************************************************************************************** ------ 前言 ------ 在Debian 13中,iptables 預設使用 nf_tables 後端 (指令為 iptables-nft / ip6tables-nft),這代表: 指令名稱仍為 iptables 和 ip6tables (保持向下相容) 底層核心架構已切換為 nftables,效能與擴充性更佳 IPv4 與 IPv6 是兩套獨立的規則集,必須分別設定 常見安全漏洞: 許多管理員只設定 IPv4 防火牆,卻忽略 IPv6。如果伺服器有 IPv6 位址而 ip6tables 規則為空,IPv6 流量將完全不受保護 適用對象: 想繼續使用 iptables 指令語法的管理員 需要同時保護 IPv4 與 IPv6 的環境 希望透過 systemd 開機自動載入規則 需要整合 Fail2ban 防止暴力攻擊 安全提醒: 錯誤的規則可能導致SSH連線中斷,操作前建議先開啟 VNC / Serial Console / IPMI 等帶外管理備援 務必將你目前的管理IP加入允許清單 (包含IPv6位址) 修改前請先備份重要資料 測試模式非常重要:腳本提供 30 秒測試模式,可在規則鎖死連線時自動復原 雲端伺服器注意:AWS、GCP、Hetzner 等平台的內網 IP(10.x.x.x)可能需要保留,否則負載平衡或監控會失效 ---------- 事前準備 ---------- 查看目前 IPv4 連線IP ss -tnp | grep :22 | grep ESTAB 查看目前 IPv6 連線IP ss -tnp | grep :22 | grep ESTAB | grep '::' 也可直接查詢目前對外IP 查詢 IPv4 curl -4 ifconfig.me 查詢 IPv6(若有) curl -6 ifconfig.me 請記下你的管理 IP (包含 IPv6 位址),稍後需填入防火牆腳本 --------------------------------- 安裝iptables防火牆並確認後端 --------------------------------- 在Debian 13中,ip6tables 是 iptables 套件的一部分,會一併安裝 更新套件清單 apt update 安裝 iptables (ip6tables會一併安裝) apt install -y iptables 確認後端類型,應顯示 iptables v1.8.11 (nf_tables) iptables --version 確認後端類型,應顯示 ip6tables v1.8.11 (nf_tables) ip6tables --version 檢查 ip6tables 指令是否存在,預期輸出:/usr/sbin/ip6tables which ip6tables 檢查IPv6是否啟用,預期輸出:net.ipv6.conf.all.disable_ipv6 = 0 (0表示啟用) sysctl net.ipv6.conf.all.disable_ipv6 檢查這台VPS/雲主機的IPv6位址是否存在,應該會顯示你的IPv6位址 (如果有的話) ip -6 addr show 檢查初始規則狀態 IPv4規則 (初始應為空或僅有基本規則) iptables -L -v -n IPv6規則 (應為空) ip6tables -L -v -n ------------------------- 停用衝突的防火牆工具 ------------------------- 注意:請勿移除 nftables 套件,它是核心 Netfilter 框架的一部分 若有安裝ufw,請將其停用以避免規則衝突 systemctl disable --now ufw 若有安裝firewalld,請將其停用以避免規則衝突 systemctl disable --now firewalld ------------------------- 防火牆腳本建立與設定 ------------------------- 建立腳本目錄 (若目錄不存在) mkdir -p /usr/local/bin 建立防火牆腳本 vi /usr/local/bin/firewall.sh請將防火牆規則腳本 firewall.sh 內容複製貼上 firewall.sh ---------------- 設定腳本權限 ---------------- 設定腳本權限 (700 表示僅 root 可讀寫執行,提高安全性) chmod 700 /usr/local/bin/firewall.sh chown root:root /usr/local/bin/firewall.sh ----------------- 測試防火牆腳本 ----------------- 執行腳本 /usr/local/bin/firewall.sh 執行後會進入 30 秒測試模式: 規則立即套用 若 30 秒內未中斷(Ctrl+C),規則自動清除,不影響後續連線 若 30 秒內按下 Ctrl+C,規則保留;此時即可確認測試通過 --------------------------------------- 另開終端機確認連線 (測試期間進行) --------------------------------------- 測試SSH連線 (應成功) ssh 你的伺服器IP 測試 IPv4 對外連線 (應成功) ping -c 3 8.8.8.8 測試 IPv6 對外連線 (若有 IPv6) ping6 -c 3 google.com 若有開放其他服務,也一併測試 --------------- 查看規則狀態 --------------- 查看 IPv4 規則 (含封包計數) iptables -L -v -n --line-numbers 查看 IPv6 規則 ip6tables -L -v -n --line-numbers -------------------------- 確認無誤後永久套用規則 -------------------------- 在測試倒數結束前按 Ctrl+C 保留規則,然後執行 /usr/local/bin/firewall.sh start ----------------------------- systemd 開機自動啟動 ----------------------------- 建立 systemd 服務檔 vi /etc/systemd/system/firewall.service 貼上以下內容 [Unit] Description=Custom iptables/ip6tables Firewall (nf_tables backend) Before=network-pre.target Wants=network-pre.target DefaultDependencies=no [Service] Type=oneshot RemainAfterExit=yes ExecStart=/usr/local/bin/firewall.sh start ExecStop=/usr/local/bin/firewall.sh stop StandardOutput=journal [Install] WantedBy=multi-user.target 儲存檔案並離開vi編輯器 按 Esc,輸入 :wq,按 Enter ------------------ 啟用並啟動服務 ------------------ 重新載入 systemd 設定 systemctl daemon-reload 設定開機自動啟動 systemctl enable firewall.service 立即啟動 systemctl start firewall.service 檢查服務狀態,應顯示 active (exited) systemctl status firewall.service 查看啟動日誌 journalctl -u firewall.service 確認 IPv4 規則已套用 iptables -L -v -n 確認 IPv6 規則已套用 ip6tables -L -v -n ------------------------ Fail2ban 安裝與配置 ------------------------ Fail2ban會持續掃描系統日誌 (如 /var/log/auth.log),偵測到多次登入失敗時,自動將來源IP加入 iptables/ip6tables 封鎖規則,提供動態的入侵防護 安裝 Fail2ban (whois用於查詢被封鎖IP的資訊) apt update apt install -y fail2ban whois 確認版本,顯示為 Fail2Ban v1.1.0 fail2ban-client --version ------------------ 建立自訂設定檔 ------------------ 為何不直接修改 jail.conf? /etc/fail2ban/jail.conf 是套件提供的預設設定,套件更新時會被覆蓋 正確做法是建立 /etc/fail2ban/jail.local,Fail2ban啟動時 .local 的設定會覆蓋 .conf,這樣可以在套件更新後保留你的自訂設定 建立 jail.local 覆蓋預設值 vi /etc/fail2ban/jail.local貼上以下內容 jail.local.txt 儲存檔案並離開vi編輯器 按 Esc,輸入 :wq,按 Enter 暫時只設定SSH防護,等待LNMP服務都安裝配置完畢,再回來增加 監獄 (Jail) 設定 ---------------------------------------- IPv6 雙棧封鎖實作 (iptables方案) ---------------------------------------- 建立自訂動作,同時操作 IPv4 與 IPv6: vi /etc/fail2ban/action.d/iptables-ipv4-ipv6.conf 貼上內容 [Definition] actionstart = iptables -N f2b-<name> ip6tables -N f2b-<name> iptables -I INPUT -p <protocol> -m multiport --dports <port> -j f2b-<name> ip6tables -I INPUT -p <protocol> -m multiport --dports <port> -j f2b-<name> actionstop = iptables -D INPUT -p <protocol> -m multiport --dports <port> -j f2b-<name> ip6tables -D INPUT -p <protocol> -m multiport --dports <port> -j f2b-<name> iptables -F f2b-<name> ip6tables -F f2b-<name> iptables -X f2b-<name> ip6tables -X f2b-<name> actionban = iptables -I f2b-<name> 1 -s <ip> -j DROP ip6tables -I f2b-<name> 1 -s <ip> -j DROP actionunban = iptables -D f2b-<name> -s <ip> -j DROP ip6tables -D f2b-<name> -s <ip> -j DROP [Init] # 預設參數 port = http,https protocol = tcp 儲存檔案並離開vi編輯器 按 Esc,輸入 :wq,按 Enter 注意:此動作會同時建立 iptables 與 ip6tables 規則,確保 IPv4 與 IPv6 請求皆能被封鎖 ------------------------ 啟動 Fail2ban ------------------------ 啟用 systemctl enable fail2ban --now --------------------- 驗證與測試 --------------------- 測試 Fail2ban 設定檔語法 fail2ban-client -t 預期輸出:OK: configuration test is successful 重新啟動 systemctl restart fail2ban ------------------- 重開機驗證 ------------------- 重開機 reboot 防火牆規則應自動載入 iptables -L -v -n ip6tables -L -v -n 確認IP轉發已啟用,應顯示 net.ipv4.ip_forward = 1 sysctl net.ipv4.ip_forward 確認 NAT 服務,應顯示 active (exited) systemctl status ip-forward.service 查看網路介面是否包含公網IP ip addr show | grep "公網IP" 例如:你主機的公網IP是 45 開頭的情況 ip addr show | grep "45" 確認 NAT 規則已套用 iptables -t nat -L -n -v 應顯示,例如 0 0 SNAT all -- * * 10.25.x.x 0.0.0.0/0 to:45.x.x.x 確認 防火牆 服務狀態,應顯示為 active (exited) systemctl status firewall.service 確認 fail2ban 服務狀態,應顯示為 active (running) systemctl status fail2ban.service 驗證iptables規則,檢查是否已產生 f2b- 開頭的規則鏈 (這代表 Fail2ban 已成功介入 iptables) IPv4 iptables -L -n | grep f2b IPv6 ip6tables -L -n | grep f2b 若剛剛拿到VPS,立刻做到這個步驟,應該無顯示任何結果 並且主機需要在線幾天後,還有 DNS 你的域名.com 有修改並指向新主機的IP,才會顯示 f2b- 開頭的規則鏈 查看所有啟用的監獄 fail2ban-client status 查看特定監獄的狀態 fail2ban-client status sshd 使用 fail2ban-client 指令來檢查指定監獄 (例如 sshd) 目前正在使用的白名單列表 確認你的修改已成功加載 VPS分配的 私有IP fail2ban-client get sshd ignoreip ---------------------------------------- 測試 IPv4 與 IPv6 是否會被封鎖 ---------------------------------------- 使用 fail2ban-client 手動觸發封鎖 手動封鎖一個測試 IPv4 地址 fail2ban-client set sshd banip 192.0.2.100 手動封鎖一個測試 IPv6 地址 fail2ban-client set sshd banip 2001:db8::100 查看監獄狀態,Banned IP 列表應顯示被封鎖的 IP fail2ban-client status sshd 查看防火牆是否真的封鎖了該 IP 剛剛手動封鎖一個測試 IPv4 192.0.2.100 iptables -L f2b-sshd -n -v 剛剛手動封鎖一個測試 IPv6 2001:db8::100 ip6tables -L f2b-sshd -n -v 解除封鎖 fail2ban-client set sshd unbanip 192.0.2.100 fail2ban-client set sshd unbanip 2001:db8::100 ---------------------- 查看日誌 ---------------------- 查看開機期間的服務日誌 journalctl -u firewall.service --boot journalctl -u fail2ban.service --boot 查看防火牆日誌 journalctl -k | grep -E "BADPKT|DROP" --------------------- 常見陷阱與排錯指南 --------------------- 陷阱 1:IPv6 防火牆未設定 症狀:IPv4 連線正常,IPv6 連線失敗或完全開放 解決:確認 ip6tables -L -n 有規則,且 ICMPv6 類型已開放 ip6tables -L -n 陷阱 2:ICMPv6 被封鎖 症狀:IPv6 連線時通時不通,或無法取得 IPv6 位址 解決:確認 IN_ICMPV6_ALLOWED 包含必要類型(133-136 等) 陷阱 3:雲端內網 IP 被封鎖 症狀:重開機後負載平衡器或監控系統無法連線 解決:在 IMPOSSIBLE_IPS 中移除對應的私有網段(如 10.0.0.0/8) 陷阱 4:忘記加入管理 IP 症狀:執行 firewall.sh start 後 SSH 立即斷線 解決:透過帶外管理重啟,或等待測試模式自動復原 陷阱 5:服務綁定問題 症狀:IPv6 防火牆開放但服務仍無法連線 解決:檢查服務是否監聽在 ::(雙棧): ss -tlnp | grep :80 :::80 表示雙棧,0.0.0.0:80 表示僅 IPv4 陷阱 6:Fail2ban 與自訂鏈衝突 症狀:Fail2ban 封鎖失效,或規則順序錯誤 解決:確認 f2b- 鏈在 INPUT 鏈中的順序(應在最後) 陷阱 7:conntrack 模組未載入 症狀:執行腳本時出現 iptables: No chain/target/match by that name 解決:手動載入模組: modprobe nf_conntrack echo "nf_conntrack" >> /etc/modules ----------------- 維護與日誌查看 ----------------- 查看被封鎖的封包 核心日誌中的防火牆記錄 journalctl -k | grep -E "BADPKT|DROP" 即時監控 dmesg -w | grep -E "BADPKT|DROP" 手動管理 Fail2ban 解除封鎖特定 IP fail2ban-client set sshd unbanip 203.0.113.99 重新載入設定 fail2ban-client reload 查看所有 jail 狀態 fail2ban-client status ------------------ 防火牆腳本維護 ------------------ 手動停止防火牆 (清除所有規則) /usr/local/bin/firewall.sh stop 手動啟動防火牆 /usr/local/bin/firewall.sh start 修改規則後測試 測試模式 /usr/local/bin/firewall.sh 測試通過後 /usr/local/bin/firewall.sh start
-
解決論壇顯示 內網IP/私有IP(VPC)的問題,新增NAT規則與IP轉發 ---------- 前言 ---------- 在阿里雲、騰訊雲等大廠雲服務商,雲主機通常會同時分配: 公網IP:用於對外提供服務 內網IP / 私有IP(VPC):用於內部網路通訊 論壇後端(如 PHP、Nginx、管理後台)在顯示使用者來源IP時,若未經設定,可能會顯示內網IP而非真實的公網IP,導致日誌分析、防護機制、使用者管理等功能異常 因此,需透過網路介面與NAT規則設定,確保對外服務的IP正確對應 ------------------ 解決方案總覽 ------------------ 1.設定 iptables NAT 規則:將來自公網IP的封包來源轉換為私有IP 2.設定開機自動載入規則:使用 systemd 服務確保重啟後規則仍生效 ---------------------------------------- 建立 iptables NAT 規則腳本 ---------------------------------------- 建立腳本存放目錄 mkdir -p /usr/local/bin 建立NAT規則腳本 vi /usr/local/bin/firewall-NAT.sh 貼入 NAT 規則 firewall-NAT.sh 修改為你的實際IP (你的公網IP 與 你的私有IP) # ========== 請修改以下設定 ========== # 你的公網IP(必填) PUBLIC_IP="" # 你的私有IP(若無則與公網相同) PRIVATE_IP="" # ============ 儲存檔案並離開vi編輯器 按 Esc,輸入 :wq,按 Enter ----------------- 賦予執行權限 ----------------- 賦予執行權限 chmod 700 /usr/local/bin/firewall-NAT.sh chown root:root /usr/local/bin/firewall-NAT.sh 立即執行 /usr/local/bin/firewall-NAT.sh start 檢查NAT規則是否已加入 iptables -t nat -L -n -v ---------------------------- 啟用IP轉發 (核心參數) ---------------------------- 建立配置文件(只需執行一次) 這兩行一起複製貼上 echo "net.ipv4.ip_forward = 1" | sudo tee /etc/sysctl.d/99-ipforward.conf sudo sysctl --system --------------------- 立即生效 --------------------- 立即生效 sysctl --system 確認狀態 sysctl net.ipv4.ip_forward 注意:若未啟用IP轉發,NAT規則將無法正確轉送封包 ---------------------------------------- 建立 systemd 服務 (開機自動執行) ---------------------------------------- 為了讓NAT規則在重啟後自動生效,建立一個新的 systemd 服務 建立 systemd 服務檔案 vi /etc/systemd/system/ip-forward.service 貼上以下內容 [Unit] Description=IP Forward NAT Rule for Aliyun VPC Public IP After=network.target firewall.service Wants=network.target [Service] Type=oneshot ExecStart=/usr/local/bin/firewall-NAT.sh start ExecStop=/usr/local/bin/firewall-NAT.sh stop RemainAfterExit=yes StandardOutput=journal [Install] WantedBy=multi-user.target 儲存檔案並離開vi編輯器 按 Esc,輸入 :wq,按 Enter ----------------- 啟用並啟動服務 ----------------- 重新載入 systemd systemctl daemon-reload 啟用並啟動服務 systemctl enable ip-forward.service systemctl start ip-forward.service 確認服務狀態,應顯示 active (exited) systemctl status ip-forward.service ------------------------ 驗證步驟,稍後再測 ------------------------ 等待到設置 iptables (nf_tables backend) IPv4 IPv6 雙棧 防火牆 設置完成,重開機後,再來驗證IP轉發 ---------------- 小結 ---------------- 在阿里雲等 VPC 環境下,將VPS 公網IP 正確對應至內網IP的完整設定流程,解決論壇後台顯示內網IP的問題 透過iptables NAT規則的搭配,並使用 systemd 確保規則持久化,能有效提升論壇的IP識別正確性與系統穩定性 若仍有網路異常或效能問題,建議進一步檢查:主機商安全組 / 防火牆規則是否開放對應埠號、是否與 Docker、其他防火牆工具衝突
-
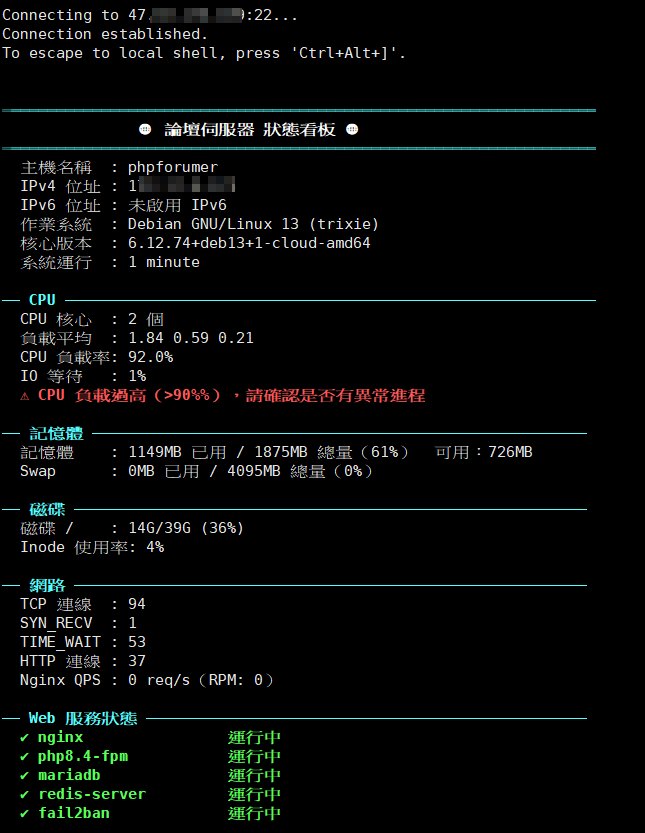
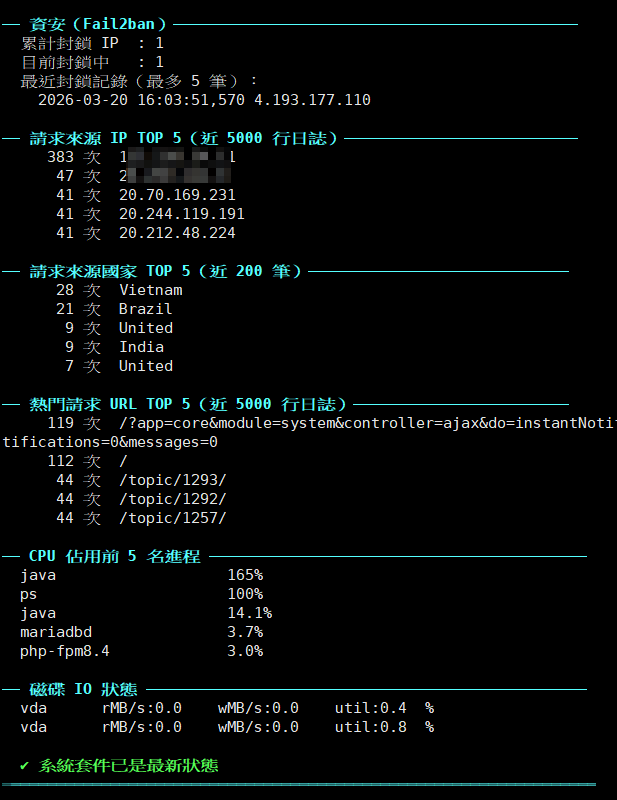
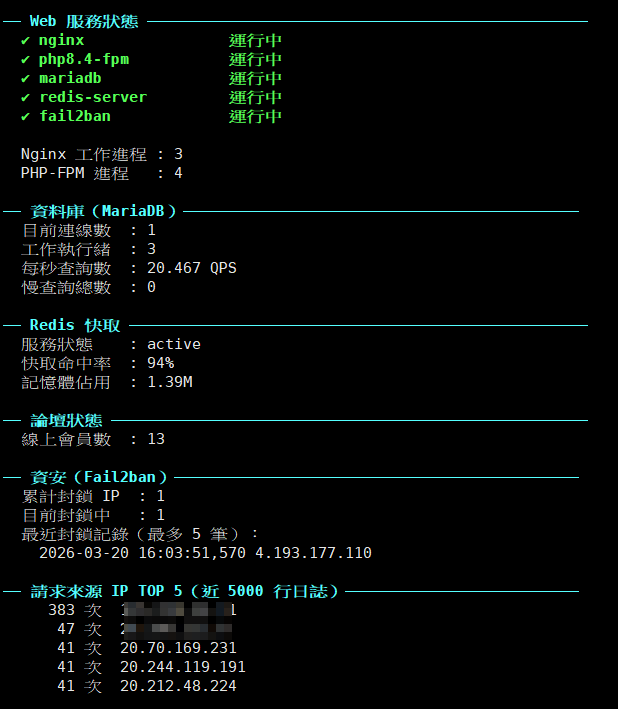
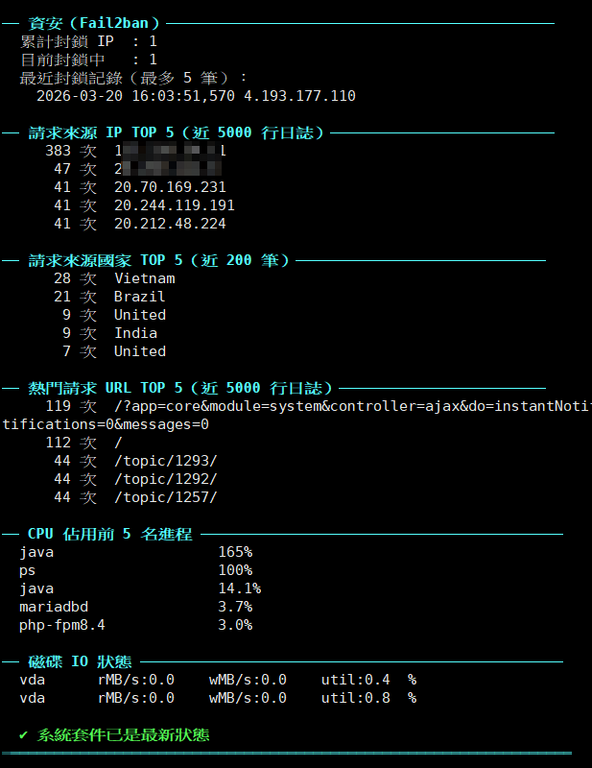
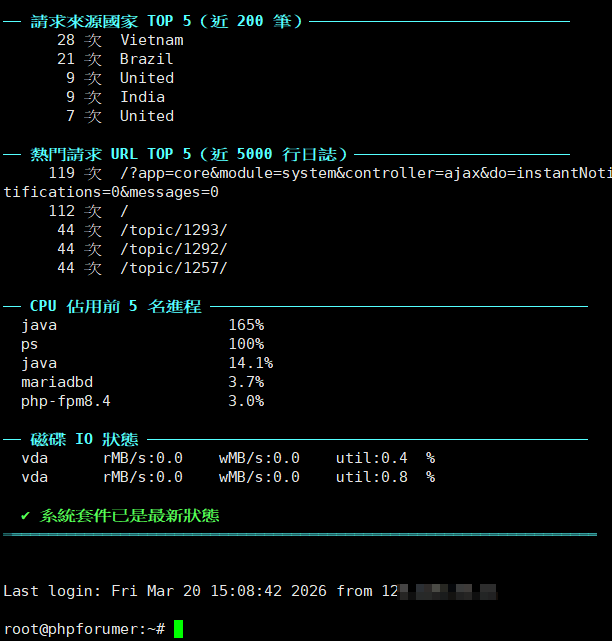
LNMP服務安裝完成,論壇也恢復後,SSH登入的監控面板情況 (要等好幾秒的時間)

-
----------------------- LNMP 整合建議 ----------------------- ------------------------------- GeoIP / MaxMind 擴充模組 ------------------------------- 若論壇需要依IP地理位置限制存取或顯示地區資訊,請安裝 MaxMind 擴充模組: apt install -y php8.4-maxminddb 在 PHP 程式中指定資料庫路徑: $reader = new MaxMind\Db\Reader('/usr/share/GeoIP/GeoLite2-City.mmdb'); $data = $reader->get('8.8.8.8'); 注意:GeoLite2 資料庫需定期更新。建議使用 geoipupdate 工具自動更新,否則IP資訊將逐漸失準
-
Debian 13 安裝Nginx官方版後,手動建立PHP FastCGI配置 ---------- 前言 ---------- 本教學適用於 Debian 13 安裝 Nginx 官方版本後,手動建立PHP所需的FastCGI配置檔,確保PHP解析能正常運作 Nginx官方版 預設不會包含 snippets/ 目錄與 fastcgi.conf,需要手動建立 目錄結構說明,手動建立以下兩個檔案 /etc/nginx/snippets/fastcgi-php.conf:PHP請求的FastCGI參數封裝 (供 server block 引用) /etc/nginx/fastcgi.conf:FastCGI通用參數設定檔 (部分系統預設為 fastcgi_params) ------------------------------ 確認PHP-FPM已安裝並運行 ------------------------------ 請先確認PHP-FPM已正確安裝且處於運行狀態,否則後續配置即使正確也無法正常解析PHP 確認PHP-FPM套件已安裝 dpkg -l | grep php8.4-fpm 確認PHP-FPM服務狀態 systemctl status php8.4-fpm 若服務未啟動,請先執行 systemctl enable --now php8.4-fpm 確認 socket 檔案存在 (後續 fastcgi_pass 會用到) ls /run/php/php8.4-fpm.sock 重要:若 socket 不存在,代表PHP-FPM未正常啟動,需先排除該問題再繼續 ------------------------------------------------------ 手動建立 /etc/nginx/snippets/fastcgi-php.conf ------------------------------------------------------ 建立目錄 mkdir -p /etc/nginx/snippets 建立 fastcgi-php.conf vi /etc/nginx/snippets/fastcgi-php.conf 貼上以下內容 fastcgi_split_path_info ^(.+\.php)(/.+)$; set $path_info $fastcgi_path_info; fastcgi_param PATH_INFO $path_info; fastcgi_index index.php; include fastcgi.conf; 儲存檔案並離開vi編輯器 按 Esc,輸入 :wq,按 Enter 說明: fastcgi_split_path_info 用來解析像是 /index.php/foo 這類路徑 try_files 可避免惡意使用者直接呼叫未存在的PHP檔案 include fastcgi.conf 會載入建立的FastCGI參數檔 ------------------------------------------ 手動建立 /etc/nginx/fastcgi.conf ------------------------------------------ 手動建立 vi /etc/nginx/fastcgi.conf 貼上以下內容 fastcgi_param SCRIPT_FILENAME $document_root$fastcgi_script_name; fastcgi_param QUERY_STRING $query_string; fastcgi_param REQUEST_METHOD $request_method; fastcgi_param CONTENT_TYPE $content_type; fastcgi_param CONTENT_LENGTH $content_length; fastcgi_param SCRIPT_NAME $fastcgi_script_name; fastcgi_param REQUEST_URI $request_uri; fastcgi_param DOCUMENT_URI $document_uri; fastcgi_param DOCUMENT_ROOT $document_root; fastcgi_param SERVER_PROTOCOL $server_protocol; fastcgi_param REQUEST_SCHEME $scheme; fastcgi_param HTTPS $https if_not_empty; fastcgi_param GATEWAY_INTERFACE CGI/1.1; fastcgi_param SERVER_SOFTWARE nginx; fastcgi_param REMOTE_ADDR $remote_addr; fastcgi_param REMOTE_PORT $remote_port; fastcgi_param REMOTE_USER $remote_user; fastcgi_param SERVER_ADDR $server_addr; fastcgi_param SERVER_PORT $server_port; fastcgi_param SERVER_NAME $server_name; fastcgi_param REDIRECT_STATUS 200; 儲存檔案並離開vi編輯器 按 Esc,輸入 :wq,按 Enter 參數說明 SCRIPT_FILENAME 告知PHP-FPM要執行的完整檔案路徑。必須為 $document_root$fastcgi_script_name HTTPS 使用 if_not_empty 確保僅在HTTPS連線時才傳遞此參數,避免HTTP連線下PHP誤判為HTTPS REQUEST_SCHEME 傳遞 http 或 https,讓PHP應用程式正確判斷協定 (在反向代理後面的部署尤為重要) REDIRECT_STATUS 設為 200,讓PHP-FPM接受由Nginx轉發的請求 (必要參數,缺少時某些PHP-FPM設定會拒絕請求) SCRIPT_FILENAME 若設定為空值或錯誤路徑,會導致PHP-FPM回傳 File not found 錯誤,這是最常見的配置問題 --------------------------------- 確認 fastcgi_params 是否存在 --------------------------------- 確認 fastcgi_params 是否存在 ls /etc/nginx/fastcgi_params 若已存在:可保留,但需確認其內容是否與 fastcgi.conf 一致 (Nginx官方版的 fastcgi_params 可能缺少 SCRIPT_FILENAME,這是與 fastcgi.conf 的主要差異) 若不存在:可建立符號連結,或直接複製 fastcgi.conf 的內容 注意:若你的 server block 中使用 include fastcgi_params;,請確保該檔案的內容與 fastcgi.conf 一致,否則可能造成 SCRIPT_FILENAME 遺漏,導致PHP-FPM無法找到要執行的腳本 ------------------------- 測試與重新載入Nginx ------------------------- 重新載入Nginx nginx -t 成功時應顯示 nginx: the configuration file /etc/nginx/nginx.conf syntax is ok nginx: configuration file /etc/nginx/nginx.conf test is successful 這時可以重新載入Nginx 重新載入Nginx systemctl reload nginx 重開機 reboot -------------------------------- 重開機驗證配置是否持續有效 -------------------------------- 重開機後,再次確認 確認Nginx配置語法 nginx -t 確認Nginx服務狀態 systemctl status nginx 應顯示 Active: active (running) 確認PHP-FPM服務狀態 (依實際版本調整) systemctl status php8.4-fpm 應顯示 Active: active (running) ---------------------- 補充說明與常見遺漏 ---------------------- 忘記建立 snippets/ 目錄,導致 include 失敗 fastcgi_pass 未正確設定 (如 unix:/run/php/php8.4-fpm.sock) 未確認 PHP-FPM 是否已安裝與啟動 未檢查 fastcgi_params 與 fastcgi.conf 的差異,導致部分應用程式出現 PATH_INFO 錯誤 未考慮HTTPS情境下的 REQUEST_SCHEME 與 HTTPS 參數傳遞 未確認 $document_root 是否與 root 指令一致
-
SSH登入提示 Part 2 安裝MaxMind GeoLite2並建立自動更新腳本 ------------- 前言 ------------- GeoLite2是MaxMind提供的免費IP地理位置資料庫,在論壇伺服器環境中應用廣泛: 安全分析 識別異常登入來源國家,配合防火牆封鎖高風險區域 流量統計 分析訪客地理分佈,生成 國家/城市 統計報表 合規政策 依地區限制內容存取,滿足GDPR等法規需求 Fail2ban整合 攻擊來源國家分析,強化封鎖策略 MOTD 顯示 即時顯示攻擊來源國家 (本教學的核心用途) ------------------------------------------- 註冊MaxMind帳號與取得License Key ------------------------------------------- 自2019年12月起,在MaxMind下載GeoLite2必須使用License Key 註冊帳號:前往官網 https://www.maxmind.com/en/geolite2/signup 註冊頁面,申請免費的GeoLite2資料庫帳號 填寫並提交註冊信息:在頁面上,你需要提供一個有效且真實的郵箱地址,這將是你的用戶名。然後設置一個密碼,並填寫其他必要的資料來完成註冊 驗證郵箱地址:提交註冊信息後,MaxMind 會向你填寫的郵箱發送一封驗證郵件。你需要登入郵箱,點擊郵件中的驗證連結來啟用帳號 取得金鑰:登入網站後,前往「My Account」>「Manage License Keys」。點擊 Generate New License Key。取得 License Key 注意事項: 註冊時,若系統提示使用「一次性郵箱」或懷疑VPN,請先關閉所有VPN或代理後重試。申請時的IP若為資料中心IP,也可能觸發限制,建議使用一般家用網路申請 ------------------------- 回到 Debian 13 伺服器 ------------------------- SSH登入你的VPS ---------------- 安裝必要工具 ---------------- apt update apt install -y curl tar gzip apt install -y mmdb-bin libmaxminddb0 libmaxminddb-dev ----------------------------- 建立 存放目錄 與 腳本 ----------------------------- 建立目錄結構 mkdir -p /usr/share/GeoIP 建立自動更新腳本 vi /usr/local/bin/update_geoip.sh 貼上以下內容,請務必將 YOUR_LICENSE_KEY 替換為你的 License Key #!/bin/bash # MaxMind GeoLite2 資料庫下載腳本 # 適用於 Debian 13 # --- 配置區域 --- # 請在此填入你的 MaxMind License Key 授權金鑰 LICENSE_KEY="YOUR_LICENSE_KEY" # 下載基礎 URL BASE_URL="https://download.maxmind.com/app/geoip_download" # 目標目錄 GEOIP_DIR="/usr/share/GeoIP" # 定義要下載的資料庫版本 (edition_id) EDITIONS=( "GeoLite2-ASN" "GeoLite2-City" "GeoLite2-Country" ) # --- 腳本本體 --- echo "$(date): 開始更新 MaxMind GeoLite2 資料庫..." # 確保目標目錄存在 mkdir -p "$GEOIP_DIR" # 切換到目標目錄 cd "$GEOIP_DIR" || exit 1 for EDITION in "${EDITIONS[@]}"; do echo "正在處理: $EDITION" # 下載最新的 .mmdb 檔案 (使用 -s 靜默模式,-L 跟隨重定向,-O 指定輸出檔案) # 使用 curl 而非 wget,因為它在 Debian 13 上預設安裝且功能完備 sudo curl -s -L -o "${EDITION}.tar.gz" \ "${BASE_URL}?edition_id=${EDITION}&license_key=${LICENSE_KEY}&suffix=tar.gz" # 檢查下載是否成功 if [ $? -ne 0 ] || [ ! -s "${EDITION}.tar.gz" ]; then echo "錯誤:下載 $EDITION 失敗" >&2 continue fi # 解壓縮,並直接將 .mmdb 檔案提取到目前目錄,覆蓋舊檔案 # --strip-components=1 會移除壓縮包內的第一層目錄 (例如 GeoLite2-City_20250101) sudo tar -xzf "${EDITION}.tar.gz" \ --strip-components=1 \ --wildcards '*.mmdb' # 檢查解壓縮是否成功 if [ $? -ne 0 ]; then echo "錯誤:解壓縮 $EDITION 失敗" >&2 else echo "$EDITION 更新完成" fi # 清理下載的壓縮檔 sudo rm -f "${EDITION}.tar.gz" echo "------------------------" done # 設定正確的權限,讓 Web 服務 (如 PHP-FPM 執行的使用者) 可以讀取 # 假設你的 PHP-FPM 執行使用者是 www-data,Nginx 也是 www-data sudo chown -R www-data:www-data "$GEOIP_DIR" sudo chmod 750 "$GEOIP_DIR" sudo find "$GEOIP_DIR" -type f -name '*.mmdb' -exec sudo chmod 640 {} \; echo "$(date): GeoLite2 資料庫更新程序結束。" 儲存檔案並離開vi編輯器 按 Esc,輸入 :wq,按 Enter ---------------------- 賦予腳本執行權限 ---------------------- chmod +x /usr/local/bin/update_geoip.sh 確認所有權 chown root:root /usr/local/bin/update_geoip.sh ------------------ 檢查是否成功 ------------------ 手動執行一次測試 /usr/local/bin/update_geoip.sh 檢查是否成功 ls -lh /usr/share/GeoIP/ 預期輸出 (檔案大小約 數MB 至 數十MB) GeoLite2-ASN.mmdb GeoLite2-City.mmdb GeoLite2-Country.mmdb 常見錯誤:若下載後執行MOTD腳本時出現「Permission denied」,通常是因為MOTD腳本以root執行,但資料庫權限設為 640 (只有 www-data 可讀) 解決方式:將 root 加入 www-data 群組,或暫時改為 644 (視安全需求決定) 方法一:將 root 加入 www-data 群組 usermod -aG www-data root 需重新登入才生效 方法二:放寬權限 (較不安全,不建議用於生產環境) chmod 644 /usr/share/GeoIP/*.mmdb ----------------------------- 設定自動更新服務 ----------------------------- 這種方式不修改官方 geoipupdate.service,而是建立相依服務,讓兩者在開機時依序執行 1. 建立自訂 Service 單元 vi /etc/systemd/system/update-geoip-custom.service 貼上內容 [Unit] Description=Custom GeoIP Update Script Before=geoipupdate.service After=network-online.target Wants=network-online.target [Service] Type=oneshot ExecStart=/usr/local/bin/update_geoip.sh User=root Group=root StandardOutput=journal StandardError=journal [Install] WantedBy=geoipupdate.service 儲存檔案並離開vi編輯器 按 Esc,輸入 :wq,按 Enter 2. 建立關聯關係 建立軟連結,讓 geoipupdate.service 啟動時一併觸發 mkdir -p /etc/systemd/system/geoipupdate.service.wants/ ln -sf /etc/systemd/system/update-geoip-custom.service /etc/systemd/system/geoipupdate.service.wants/ 3. 重新載入並測試 systemctl daemon-reload systemctl restart geoipupdate 現在執行 systemctl restart geoipupdate 時,systemd 會依序: 先執行 update-geoip-custom.service (你的自訂腳本) 再執行 geoipupdate.service (MaxMind官方更新程序) ---------------- 驗證資料庫 ---------------- 查詢國家: mmdblookup --file /usr/share/GeoIP/GeoLite2-Country.mmdb --ip 8.8.8.8 查詢城市: mmdblookup --file /usr/share/GeoIP/GeoLite2-City.mmdb --ip 8.8.8.8 查詢 ASN: mmdblookup --file /usr/share/GeoIP/GeoLite2-ASN.mmdb --ip 8.8.8.8 若顯示 "United States"、"Mountain View"、"AS15169" 等資訊,代表資料庫運作正常 --------------------------- 檢查服務狀態 --------------------------- systemctl status geoipupdate.service systemctl status geoipupdate.timer systemctl status update-geoip-custom.service ----------------------- 驗證SSH登入效果 ----------------------- 登出 exit 重新SSH登入,確認動態MOTD正常顯示 -------------------- 常見問題排查 -------------------- MOTD登入後完全不顯示 1. 確認腳本有執行權限 ls -la /etc/update-motd.d/10-system-info 2. 直接執行腳本,看是否有錯誤輸出 bash /etc/update-motd.d/10-system-info 3. 確認 PAM 設定 grep -n motd /etc/pam.d/sshd 4. 確認 SSH 設定 sshd -T | grep printmotd MOTD顯示但顏色全部消失 部分 SSH 客戶端(如舊版 PuTTY)預設不啟用 ANSI 色彩。在客戶端開啟 ANSI / xterm-256color 終端機模擬即可 GeoIP 查詢顯示 Permission denied 確認資料庫擁有者與權限 ls -lah /usr/share/GeoIP/ 臨時解法:允許 root 讀取 usermod -aG www-data root 重新登入後生效 sysstat 磁碟 IO 顯示空白 確認已啟用 grep ENABLED /etc/default/sysstat 應顯示:ENABLED="true" 確認服務運行 systemctl status sysstat 等待至少10分鐘讓 sysstat 收集資料後再次查看 SSH登入速度明顯變慢 (超過3 秒) 原因通常是腳本中的 sleep 1 (QPS計算) 加上GeoIP查詢。調整方式: 減少 GeoIP 分析的日誌行數(在腳本中從 200 改為 50) tail -n 50 "$_LOG" 或完全停用 GeoIP 分析(將對應程式碼區塊註解掉) ------------------------ 結語與後續擴展建議 ------------------------ 透過妥善規劃的動態MOTD,管理員在每次SSH登入時即可立刻掌握伺服器的健康狀態 對於資源受限的 2 GB VPS 而言,在問題影響論壇之前提早察覺記憶體或磁碟的異常,是非常實際的維運價值 後續可考慮的擴展方向: 更完整的即時監控 Netdata (輕量,適合 2 GB VPS) 指標長期儲存與警報 Prometheus + Grafana 日誌分析自動化 GoAccess (Nginx 日誌即時分析) 多伺服器集中管理 Zabbix、Grafana Alloy 自動封鎖惡意來源國 Nginx GeoIP 模組 + MaxMind
-
SSH登入提示 Part 1 + (監控 記憶體、硬碟使用率) + (監控 Nginx、PHP、MariaDB) + 監控面板 ---------- 前言 ---------- 什麼是MOTD? MOTD (Message of the Day) 是使用者透過SSH登入Linux系統時,系統自動顯示的歡迎訊息。MOTD常用於以下用途: 即時系統資訊:CPU負載、記憶體、磁碟使用率,一眼掌握健康狀態 服務監控:Nginx、PHP-FPM、MariaDB、Redis 運作狀態,停止立即告警 資安警示:Fail2ban 封鎖數、SYN Flood 偵測,異常立即可見 流量分析:即時 QPS、攻擊來源 IP/國家、熱門URL 論壇資訊:線上人數、資料庫查詢效率 2GB VPS 的特殊考量:記憶體資源有限,若記憶體或磁碟異常,越快發現損失越小。動態MOTD讓你在問題影響論壇之前就能提早察覺 -------------------- MOTD的運作機制 -------------------- Linux 系統中的MOTD分為兩種類型: 靜態MOTD /etc/motd 純文字檔,內容固定不變 動態MOTD /etc/update-motd.d/ 由腳本動態產生,每次登入時即時執行 注意:在Debian 13中,若同時存在靜態與動態MOTD,兩者的內容都會顯示 若只想顯示動態內容,建議將 /etc/motd 的內容清空 --------------------- 腳本用途與背景 --------------------- 什麼是 update-motd.d? Linux系統在使用者透過SSH登入時,會自動執行 /etc/update-motd.d/ 目錄下所有可執行的腳本,並將輸出顯示為「每日訊息」 (Message of the Day,MOTD) 這套機制讓管理員在登入的瞬間就能掌握伺服器現況,無需手動執行 top、df、ss 等指令 -------------------- 腳本命名規則 -------------------- 目錄內的腳本以數字開頭,系統會依序執行: /etc/update-motd.d/ 00-header ← 最先執行(通常是歡迎訊息) 10-system-info ← 本教學的腳本位置 90-updates ← 較晚執行 數字越小優先執行。10-system-info 是常見慣例,代表「基礎系統資訊」 ------------------------ 為什麼需要自訂腳本? ------------------------ Debian預設的MOTD只顯示最基本的資訊,對於運行論壇的生產伺服器而言遠遠不夠。自訂腳本可以讓你在登入瞬間看到: CPU負載、記憶體、磁碟使用狀況 Nginx / PHP-FPM / MariaDB / Redis 服務狀態 即時網路連線數與 QPS Fail2ban封鎖狀況與最新攻擊IP 論壇線上人數 ----------------------- 安裝必要套件 ----------------------- 基礎工具 (通常已內建) apt install -y procps iproute2 coreutils Fail2ban (防暴力破解) apt install -y fail2ban sysstat (提供 iostat,用於磁碟 IO 統計) apt install -y sysstat MaxMind GeoLite2 官方更新工具 apt install -y geoipupdate mmdb-bin Redis 客戶端工具 apt install -y redis-tools 啟用 sysstat 資料收集 (磁碟 IO 統計),Debian預設未啟用 sed -i 's/ENABLED="false"/ENABLED="true"/' /etc/default/sysstat 新手常見遺漏:忘記啟用 sysstat 導致 iostat 無法收集歷史資料,MOTD的磁碟IO區塊會顯示空白 ------------------ 啟用服務 ------------------ systemctl enable --now sysstat systemctl enable --now fail2ban systemctl enable --now geoipupdate.service systemctl enable --now geoipupdate.timer ------------------------- 重啟服務 ------------------------- systemctl restart sysstat systemctl restart fail2ban systemctl restart geoipupdate systemctl restart geoipupdate.timer systemctl restart geoipupdate.service --------------------------- 檢查服務狀態 --------------------------- systemctl status fail2ban systemctl status geoipupdate.service systemctl status geoipupdate.timer 檢查 sysstat 服務狀態 systemctl status sysstat 正常會看到類似: Loaded: loaded (/usr/lib/systemd/system/sysstat.service; enabled; preset: enabled) Active: active (exited) 測試資料收集 (應輸出CPU使用率) sar -u 1 3 確認日誌目錄已產生資料檔 (檔名數字為日期) ls /var/log/sysstat/ 預期輸出範例:sa13 sar13 --------------------- 靜態MOTD --------------------- 靜態MOTD適合用來顯示固定的警告訊息、伺服器識別資訊或使用規範聲明 修改 vi /etc/motd 修改原有內容,建議將內容清空 儲存檔案並離開vi編輯器 按 Esc,輸入 :wq,按 Enter 測試結果,先SSH登出 exit 再次SSH登入,應可看到已刪除靜態MOTD的情況 --------------------------------------------- 動態MOTD (適用於即時系統資訊) --------------------------------------------- 動態MOTD透過 Shell 腳本在每次登入時即時產生系統狀態資訊,非常適合用來監控VPS,讓管理員一登入就掌握伺服器狀況 ------------------------------------------ 建立自訂腳本,進入動態MOTD目錄 ------------------------------------------ cd /etc/update-motd.d/ ls -la 目錄中的腳本會依 檔名的數字前綴 由小到大依序執行。建議命名規則: | 前綴 | 用途建議 |--------|---------- | 00–09 | 橫幅標題、安全警告 | 10–49 | 系統資訊 (負載、記憶體、磁碟) | 50–79 | 服務狀態 | 80–99 | 更新通知、其他提示 建立系統資訊腳本 vi /etc/update-motd.d/10-system-info 貼上以下內容 (請注意:第1行不能為空白) 10-system-info.txt 儲存檔案並離開vi編輯器 按 Esc,輸入 :wq,按 Enter ----------------- 賦予執行權限 ----------------- 確保腳本有執行權限 chmod +x /etc/update-motd.d/10-system-info 確認所有權 chown root:root /etc/update-motd.d/10-system-info -------------------- 停用預設的腳本 -------------------- Debian 13 已有預設腳本 10-uname,若不需要可移除執行權限 chmod -x /etc/update-motd.d/10-uname 2>/dev/null || true ------------------ 確認PAM設定 ------------------ Debian使用PAM控制MOTD顯示,編輯PAM設定檔 編輯 vi /etc/pam.d/sshd 找到這兩行,確保這兩行存在且未被註解 (無 # 符號) session optional pam_motd.so motd=/run/motd.dynamic session optional pam_motd.so noupdate 儲存檔案並離開vi編輯器 按 Esc,輸入 :wq,按 Enter ------------------------- 開啟 SSH 主配置檔 ------------------------- 編輯 vi /etc/ssh/sshd_config ## 將 PrintMotd no 改 yes PrintMotd yes # 加入 或 修改 UseDNS no GSSAPIAuthentication no PrintLastLog yes 儲存檔案並離開vi編輯器 按 Esc,輸入 :wq,按 Enter ---------------------------- 強制重新產生MOTD快取 ---------------------------- 清除快取 rm -f /var/run/motd.dynamic 重新產生 run-parts /etc/update-motd.d/ > /var/run/motd.dynamic 查看結果 cat /var/run/motd.dynamic ------------------------- 完整的SSH與PAM重啟 ------------------------- 重啟SSH服務 systemctl restart sshd 確認SSH設定 sshd -T | grep -E "(printmotd|printlastlog)" 預期輸出應該包含: printmotd yes printlastlog yes ------------------ 驗證 ------------------ 驗證設定檔語法 sshd -t 如果語法正確,重啟 SSH 服務 systemctl restart sshd ---------------- 立即測試腳本 ---------------- 直接執行腳本檢查輸出 bash /etc/update-motd.d/10-system-info ----------------------- 驗證SSH登入效果 ----------------------- 登出 exit 重新SSH登入,確認動態MOTD正常顯示 ------------------------ 前往 Part 2 ------------------------ SSH登入提示 Part 2 安裝MaxMind GeoLite2並建立自動更新腳本
-
Debian 13 系統資源限制調校 Part 2 全域核心優化 之前Debian 13配置時,已做了Part 1 Debian 13 系統資源限制調校 Part 1 (VPS 2C/2GB RAM) https://phpforumer.com/topic/1290/ 現在 LNMP 配置完後,接續修改Part 2 ---------------------------------------- 全域核心 sysctl 優化 ---------------------------------------- 強烈建議:不要直接修改 /etc/sysctl.conf,以避免系統更新時覆蓋設定 Debian支援在 /etc/sysctl.d/ 目錄下放置獨立的設定檔,便於版本管理與追蹤 建立專用設定檔 vi /etc/sysctl.d/99-lnmp-optimization.conf 寫入以下內容 # ===== 系統級別檔案處理 ===== # 整個系統可以開啟的最大檔案描述符總數 # 必須大於所有服務的 LimitNOFILE 設定值之總和 fs.file-max = 2097152 # 單一行程可分配的最大檔案描述符數量上限 # 此值必須 >= 任何服務的 LimitNOFILE 設定值 fs.nr_open = 2097152 # ===== 網路效能調校 ===== # BBR + 網路優化 已寫在 /etc/sysctl.d/99-network-optimization.conf # ===== 虛擬記憶體調校 ===== # 降低 Swap 使用傾向(0=盡量不用 Swap,100=積極使用) # 2GB VPS 建議設為 10,優先保留記憶體給應用程式 # vm.swappiness = 10 # 降低 dirty page 寫回比例,避免 I/O 突刺 vm.dirty_ratio = 15 vm.dirty_background_ratio = 5 儲存檔案並離開vi編輯器 按 Esc,輸入 :wq,按 Enter 立即套用核心參數 (無需重開機) sysctl -p /etc/sysctl.d/99-lnmp-optimization.conf ------------------------- 驗證是否已套用 ------------------------- sysctl fs.file-max # 降低Swap使用傾向,沒修改,則顯示預設 = 60 sysctl vm.swappiness ------------------------------------------ 服務級別限制調校 systemd Override ------------------------------------------ 這是整個調校的核心。使用 systemd override 的方式,可避免服務套件更新時覆蓋自訂設定 重要:/etc/security/limits.conf 對 systemd 管理的服務無效 MariaDB、Nginx、PHP-FPM 均須透過各自的 override.conf 設定資源限制 以下設定以 2 vCPU / 2GB RAM VPS 為基準,請依實際監控數據微調 ---------------------- MariaDB 資料庫 ---------------------- mkdir -p /etc/systemd/system/mariadb.service.d/ 編輯 vi /etc/systemd/system/mariadb.service.d/override.conf 寫入以下內容 [Service] # ===== 檔案描述符限制 ===== # 資料庫需要處理大量連線與資料檔案,此值應設定足夠高 LimitNOFILE=65535 LimitNPROC=65535 # ===== 記憶體限制 ===== # MemoryMax:絕對硬上限,超過即被 OOM Killer 終止 # MemoryHigh:軟性高水位,超過時系統會積極嘗試回收記憶體 MemoryMax=1536M MemoryHigh=1280M # ===== CPU 限制 ===== # 限制 CPU 使用率,避免資料庫查詢佔用所有 CPU 資源 # 2 vCPU 環境:CPUQuota=80% 表示最多使用 0.8 顆核心 # 若要充分利用兩顆核心,可調整為 160% CPUQuota=160% # ===== I/O 優先級 ===== # 提高資料庫的磁碟 I/O 優先級 # IOSchedulingClass=2 為 Best Effort(cfq/bfq 排程器) # IOSchedulingPriority 範圍 0(最高)~ 7(最低),4 為中等偏高 IOSchedulingClass=2 IOSchedulingPriority=4 # ===== 穩定性策略 ===== # 服務崩潰後自動重啟,RestartSec 為等待秒數 Restart=always RestartSec=10s # ===== 其他系統限制 ===== # 允許記憶體鎖定(mlock),避免關鍵資料被 Swap 出去 # 對 InnoDB Buffer Pool 等效能敏感操作有幫助 LimitMEMLOCK=infinity # 堆疊大小(單位:位元組,此處為 10MB) LimitSTACK=10485760 儲存檔案並離開vi編輯器 按 Esc,輸入 :wq,按 Enter ----------------------- Nginx 網頁伺服器 ----------------------- mkdir -p /etc/systemd/system/nginx.service.d/ 編輯 vi /etc/systemd/system/nginx.service.d/override.conf 寫入以下內容 [Service] # ===== 檔案描述符限制 ===== # 每個 HTTP 連線、靜態檔案、upstream 連線、Log 檔案都需要計入 LimitNOFILE=65535 LimitNPROC=65535 # ===== 記憶體限制 ===== # Nginx 以事件驅動架構著稱,記憶體用量很低 # 但仍需設定上限防止記憶體洩漏時無限成長 MemoryMax=512M MemoryHigh=384M # ===== CPU 限制 ===== # 靜態檔案服務 CPU 消耗較低,動態代理時消耗稍高 CPUQuota=50% # ===== 穩定性策略 ===== Restart=always RestartSec=5s 儲存檔案並離開vi編輯器 按 Esc,輸入 :wq,按 Enter ------------------------ PHP-FPM ------------------------ mkdir -p /etc/systemd/system/php8.4-fpm.service.d 編輯 vi /etc/systemd/system/php8.4-fpm.service.d/override.conf 寫入以下內容 [Service] # ===== 檔案描述符限制 ===== # PHP-FPM 可能同時連接資料庫、Redis、Session 儲存等多個外部資源 LimitNOFILE=65535 LimitNPROC=65535 # ===== 記憶體限制 ===== # PHP 動態內容處理是記憶體消耗主要來源之一 # 此限制為 PHP-FPM master + 所有 worker 行程的記憶體總和 MemoryMax=768M MemoryHigh=512M # ===== CPU 限制 ===== # PHP 腳本執行 (模板渲染、資料庫查詢組裝) 對CPU消耗較高 CPUQuota=70% # ===== 穩定性策略 ===== Restart=always RestartSec=10s 儲存檔案並離開vi編輯器 按 Esc,輸入 :wq,按 Enter ------------------------ 套用、驗證與監控 ------------------------ 設定完成後,必須依序執行以下步驟使設定生效 套用設定並重啟服務 重新載入 systemd 配置 (讓 systemd 讀取新增的 override 檔案) systemctl daemon-reload 依序重啟所有服務 systemctl restart mariadb systemctl restart nginx systemctl restart php8.4-fpm 確認服務狀態 systemctl status mariadb systemctl status nginx systemctl status php8.4-fpm 每個服務都應顯示 active (running) ---------------------- 驗證限制是否生效 ---------------------- 重要:查看 /proc/<PID>/limits 才是確認設定是否真正生效的唯一標準,而非查看設定檔本身 驗證各服務的檔案描述符限制 Max open files 應為 65535 MariaDB cat /proc/$(pgrep -o mariadbd)/limits | grep "Max open files" 驗證檔案描述符限制 Max open files 應為 65535 Nginx (取 master process PID) cat /proc/$(pgrep -o nginx)/limits | grep "Max open files" 驗證檔案描述符限制 Max open files 應為 65535 PHP-FPM (取 master process PID) cat /proc/$(pgrep -o php-fpm)/limits | grep "Max open files" 驗證檔案描述符限制 Max open files 應為 65535 使用 systemd 指令查看詳細屬性 systemctl show mariadb | grep -E "(LimitNOFILE|MemoryMax|CPUQuota)" systemctl show nginx | grep -E "(LimitNOFILE|MemoryMax|CPUQuota)" systemctl show php8.4-fpm | grep -E "(LimitNOFILE|MemoryMax|CPUQuota)" 查看核心檔案描述符使用狀況 查看 cat /proc/sys/fs/file-nr 輸出:已使用 未使用 最大值 ------------------ 安裝監控工具 ------------------ 安裝監控工具 apt update && apt install -y htop iotop iftop nethogs lsof 即時查看 CPU / 記憶體 / 行程使用量 htop 監控磁碟 I/O 使用狀況 iotop 即時網路流量監控 iftop 依行程分類顯示網路流量 nethogs 計算特定行程目前開啟的檔案數 lsof -p <PID> \| wc -l ---------------------- 設定日誌輪替 ---------------------- 避免日誌檔案無限增長而佔滿磁碟空間,這是生產環境容易忽略的維運重點 建立 vi /etc/logrotate.d/lnmp 貼上內容 /var/log/mysql/*.log /var/log/nginx/*.log /var/log/php8.4-fpm.log { daily # 每天輪替 rotate 30 # 保留 30 天份日誌 missingok # 日誌檔遺失時不報錯 compress # 壓縮舊日誌(使用 gzip) delaycompress # 延遲一次壓縮,確保服務釋放舊檔案後再壓縮 notifempty # 日誌為空則不執行輪替 create 0640 www-data adm # 建立新日誌檔的權限與擁有者 sharedscripts # 所有日誌輪替完成後,只執行一次 postrotate postrotate # 通知服務重新開啟日誌檔(發送 USR1 訊號) [ -f /var/run/mysqld/mysqld.pid ] && kill -USR1 $(cat /var/run/mysqld/mysqld.pid) 2>/dev/null || true [ -f /var/run/nginx.pid ] && kill -USR1 $(cat /var/run/nginx.pid) 2>/dev/null || true endscript } 儲存檔案並離開vi編輯器 按 Esc,輸入 :wq,按 Enter -------------------------------- 測試 logrotate 設定是否正確 -------------------------------- 測試 logrotate 設定是否正確 (加上 --debug 不實際執行) logrotate --debug /etc/logrotate.d/lnmp ---------------------------------------------- 2GB RAM VPS 記憶體配置建議 ---------------------------------------------- MariaDB 768MB ~ 1024MB 記憶體消耗大戶,InnoDB Buffer Pool 需足夠大 PHP-FPM 512MB 依 worker 數量與每個 worker 的 memory_limit 決定 Nginx 256MB 極低,事件驅動架構 Redis (選用) 128MB 用於 Session 或頁面快取 系統及其他 384MB OS 核心、SSH、Cron 等 合計 約 2GB 重要提醒:systemd 的 MemoryMax 設定值總和可以略高於實體記憶體,但若所有服務同時達到尖峰,仍可能觸發 OOM Killer 強制終止行程 請務必根據實際監控數據進行微調,切勿照單全收 ------------------------- 論壇部署最終檢查清單 ------------------------- 完成所有設定後,請逐項確認: 系統基礎 /etc/security/limits.conf 已針對所有使用者設定完成 Swap 空間已建立並設定開機自動掛載 /etc/sysctl.d/99-lnmp-optimization.conf 已建立,核心參數已套用 sysctl -p 防火牆 已啟用,僅開放 22、80、443 連接埠 服務設定 MariaDB、Nginx、PHP-FPM 的 systemd override.conf 均已正確建立 執行 systemctl daemon-reload 並已重啟所有服務 三個服務的 systemctl status 均顯示 active (running) 使用 cat /proc/<PID>/limits 驗證每個服務的 Max open files 均為 65535 安全性 已變更 MariaDB 的 root 密碼,並移除匿名帳號與測試資料庫 mysql_secure_installation Nginx 已關閉版本號顯示 server_tokens off PHP 已設定 expose_php = Off、display_errors = Off 已確認 AppArmor 或 SELinux 狀態不會阻擋服務運作 HTTPS TLS/SSL 已設定 維運 日誌輪替 logrotate 設定已完成並通過 --debug 測試 資料庫、網站檔案、設定檔的自動化備份策略已建立 (如 cron + rsync 或 borgbackup) 基礎監控告警已設定 (如 netdata、prometheus + node_exporter、或被動式監控服務) 快速狀態檢查腳本 /root/check-lnmp-limits.sh 已建立並可正常執行 --------------- 常見問題 --------------- Q1: 修改了 /etc/security/limits.conf,為什麼重啟 MariaDB 後,查看 /proc/pid/limits 還是沒變? 因為 MariaDB 是由 systemd 管理的服務,它不會讀取 limits.conf 你必須在對應的 systemd override.conf 中設定 LimitNOFILE Q2: 如何快速確認目前整個系統或特定服務開啟了多少檔案? 系統整體 cat /proc/sys/fs/file-nr 輸出: 已分配數 未使用數 總上限 查看特定服務 (以 nginx master process 為例) 開啟了多少檔案 lsof -p $(pgrep -o nginx) 2>/dev/null | wc -l Q3: 修改了 systemd override 並 daemon-reload 重啟後,服務卻無法啟動了,怎麼辦? 查看錯誤日誌 journalctl -u mariadb -xe --no-pager 檢查服務狀態 systemctl status mariadb 驗證 systemd 讀取到的限制值 systemctl show mariadb | grep -i "limitnofile\|memory" 常見原因: override.conf 語法錯誤 如多餘空格、缺少區段標頭 [Service] 設定了不支援的參數名稱 MemoryMax 值設得太小,服務一啟動就因超限而被終止 服務名稱與實際安裝的版本不符 (如 PHP 版本號) Q4:CPUQuota 設定的百分比是相對於什麼? CPUQuota=80% 表示允許使用最多 80% 的單顆CPU核心時間 若VPS有2顆 vCPU,則 CPUQuota=160% 才等於充分利用兩顆核心 請依VPS實際核心數調整 Q5:MemoryMax 和 MemoryHigh 有什麼差別? MemoryHigh 軟性高水位。超過後,系統會積極嘗試回收該服務的記憶體,但不會強制終止服務 MemoryMax 絕對硬上限。超過後,服務內的行程會被 OOM Killer 立即終止 建議將 MemoryHigh 設為 MemoryMax 的 80~85%,讓系統有空間提前介入,避免觸及硬上限 Q6:MariaDB 無法啟動 可能原因與解決方法: 查看錯誤日誌 journalctl -u mariadb -n 50 驗證設定檔語法 mariadbd --validate-config 若調整 innodb_log_file_size 後發生錯誤,刪除舊的 redo log 讓 MariaDB 重建 systemctl stop mariadb rm /var/lib/mysql/ib_logfile* systemctl start mariadb 檢查資料目錄權限 ls -la /var/lib/mysql chown -R mariadb:mariadb /var/lib/mysql Q7:Too many connections 錯誤 暫時調高連線數(立即生效) sudo mariadb -e "SET GLOBAL max_connections = 150;" 查看閒置連線 sudo mariadb -e "SHOW PROCESSLIST;" 終止閒置過久的連線 sudo mariadb -e "SHOW PROCESSLIST;" | grep Sleep | awk '{print "KILL "$1";"}' | mysql 永久調整請修改 50-server.cnf 中的 max_connections 後重啟服務 提示:應用端建議實作連線池 (如 PHP PDO persistent connection),可大幅降低連線開銷 Q8:磁碟空間持續增加 檢查磁碟使用 df -h du -sh /var/lib/mysql/ 檢查 Binary Log 使用狀況 sudo mariadb -e "SHOW BINARY LOGS;" 手動清除 7 天前的 Binary Log sudo mariadb -e "PURGE BINARY LOGS BEFORE DATE_SUB(NOW(), INTERVAL 7 DAY);" 檢查日誌大小 ls -lh /var/log/mysql/ 若完全不需要主從複製,可將 50-server.cnf 中 log-bin 相關行全部註解掉 Q9:innodb_buffer_pool_size 設定後發生 OOM 檢查記憶體使用 free -h top -o %MEM 2 GB 總記憶體建議 innodb_buffer_pool_size = 768M,並為系統 + 其他服務保留至少 512 MB 若系統頻繁使用 Swap,應考慮升級記憶體或降低 buffer pool Q10:設定檔改了但未生效 確認目前生效的設定 mariadbd --print-defaults 找出所有載入的設定檔路徑 mariadbd --help --verbose | grep -A 1 "Default options" 確認修改的檔案是否在載入列表中,再重新啟動 systemctl daemon-reload systemctl restart mariadb 確認特定參數 sudo mariadb -e "SHOW VARIABLES LIKE '參數名稱';" ----------------------- 快速健康檢查腳本 ----------------------- 建立 vi /root/mysql_healthcheck.sh 貼上以下內容 mysql_healthcheck.sh 儲存檔案並離開vi編輯器 按 Esc,輸入 :wq,按 Enter ------------------ 賦予執行權限 ------------------ 賦予執行權限 chmod 700 /root/mysql_healthcheck.sh chown root:root /root/mysql_healthcheck.sh 執行腳本 /root/mysql_healthcheck.sh -------------------------- crontab 定時任務 -------------------------- 設定每小時定期執行 crontab -e 加入以下行 0 * * * * /root/mysql_healthcheck.sh >> /var/log/mysql_health.log 2>&1 儲存檔案並離開vi編輯器 按 Esc,輸入 :wq,按 Enter ----------------- 快速檢查腳本 ----------------- 將以下腳本儲存為 /root/check-lnmp-limits.sh,方便日後快速檢查系統狀態 編輯 vi /root/check-lnmp-limits.sh 貼上以下內容 check-lnmp-limits.sh 儲存檔案並離開vi編輯器 按 Esc,輸入 :wq,按 Enter 賦予執行權限 chmod 700 /root/check-lnmp-limits.sh chown root:root /root/check-lnmp-limits.sh 執行腳本 /root/check-lnmp-limits.sh
-
Debian 13 系統資源限制調校 Part 1 (VPS 2C/2GB RAM) ---------- 前言 ---------- 本文針對在Debian 13系統上,以2GB RAM VPS架設高效能、穩定運行的 LNMP (Linux、Nginx、MariaDB、PHP) 論壇而設計 重點在於 Linux 系統的資源限制調校,確保論壇在遭遇流量高峰時能平穩運行,避免因資源耗盡而崩潰 核心觀念:Linux 兩種資源限制 在開始設定前,務必理解以下兩個不同層級的資源限制機制 1. /etc/security/limits.conf (登入Shell限制) 作用對象:透過SSH或本機終端機登入的使用者所執行的程序 (如 vim,bash,ls) 對服務的影響:對由 systemd 啟動的系統服務 (如 Nginx、MariaDB、PHP-FPM) 完全無效 原因說明:systemd 作為 PID 1 (1號行程),會跳過傳統的 PAM (Pluggable Authentication Modules) 登入認證流程,因此完全不讀取 limits.conf 2. systemd Override (服務單元限制) 作用對象:由 systemd 初始化並管理的所有系統服務 對服務的影響:這是現代Linux發行版中,設定服務資源限制的唯一正確途徑 常見誤區:修改了 limits.conf 後重啟服務,發現 /proc/<PID>/limits 數值未改變。這是正常現象,請直接前往 systemd override 進行設定 ---------------------- 系統層級調校 ---------------------- 此部分設定會影響所有使用者登入後的環境,以及整個Linux核心的行為 -------------------------------- 使用者登入限制 limits.conf -------------------------------- 雖然此設定對 systemd 管理的服務本身無效,但仍有設定價值:可保護管理者登入後的操作環境,防止 vim、grep 等指令因開啟檔案過多而失敗 編輯 vi /etc/security/limits.conf 在末尾加入以下內容 # 格式: <domain> <type> <item> <value> # domain: * 代表所有使用者 # type: soft (軟限制,可超越至hard) / hard (硬限制,絕對上限) # 所有使用者 * soft nofile 65535 * hard nofile 65535 * soft nproc 65535 * hard nproc 65535 * soft stack 10240 * hard stack 10240 # root 使用者特殊設定 (通常需要較高的行程與檔案操作權限) root soft nofile 65535 root hard nofile 65535 root soft nproc unlimited root hard nproc unlimited 儲存檔案並離開vi編輯器 按 Esc,輸入 :wq,按 Enter 說明:nofile 為可開啟的最大檔案描述符數量;nproc 為最大行程數;stack 為堆疊大小 (單位 KB) 重開機使設定生效 reboot ---------------------------------------- 全域核心 Kernel sysctl 優化 ---------------------------------------- 此部分等待 LNMP 配置完後,再來修改 Debian 13 系統資源限制調校 Part 2 全域核心優化
-
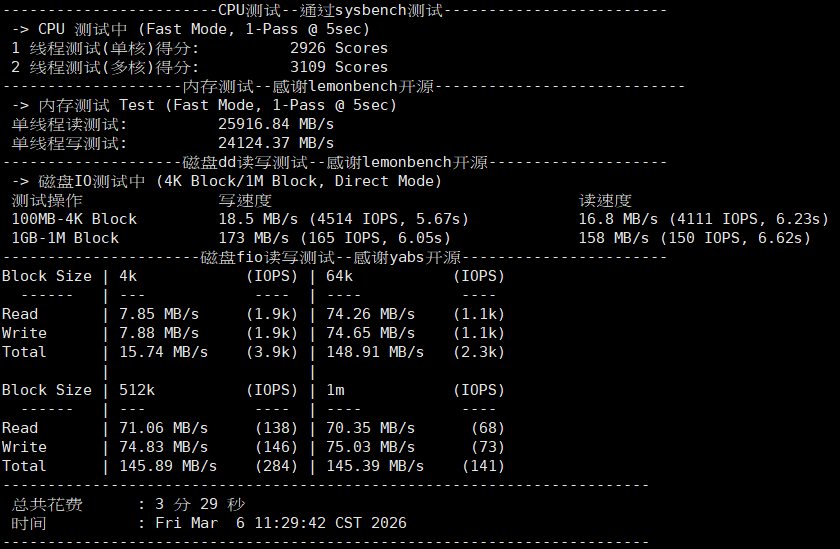
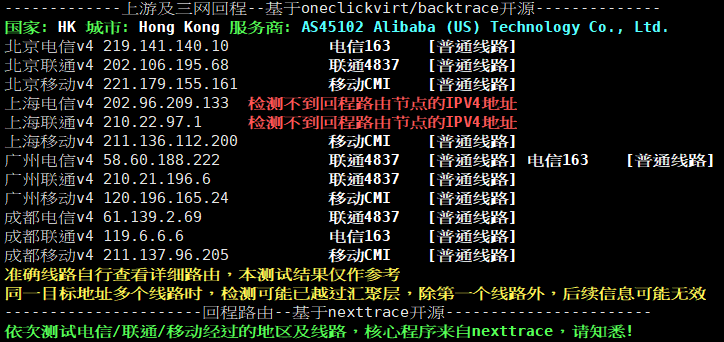
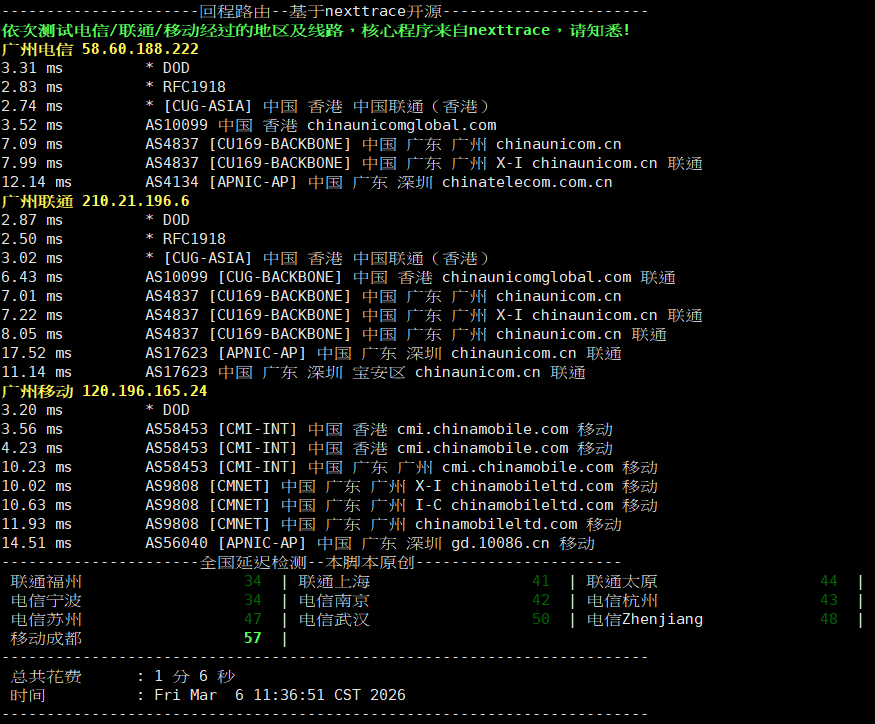
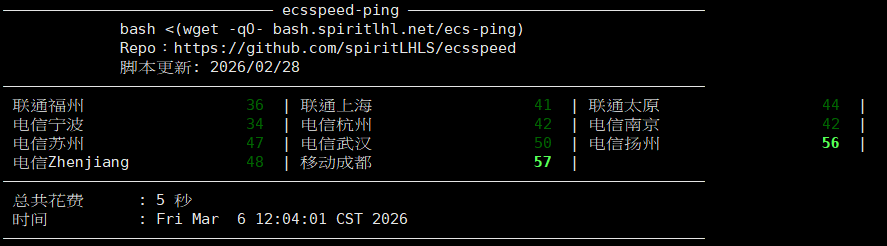
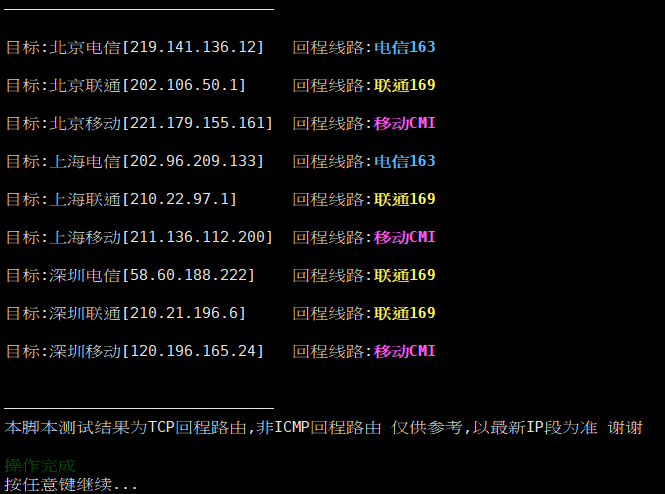
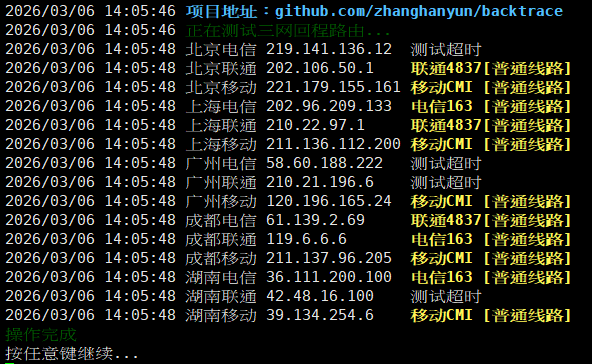
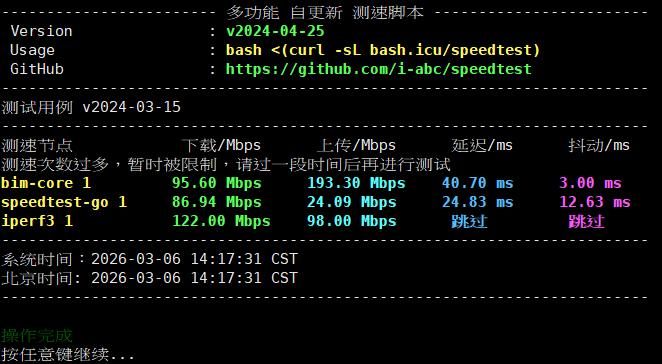
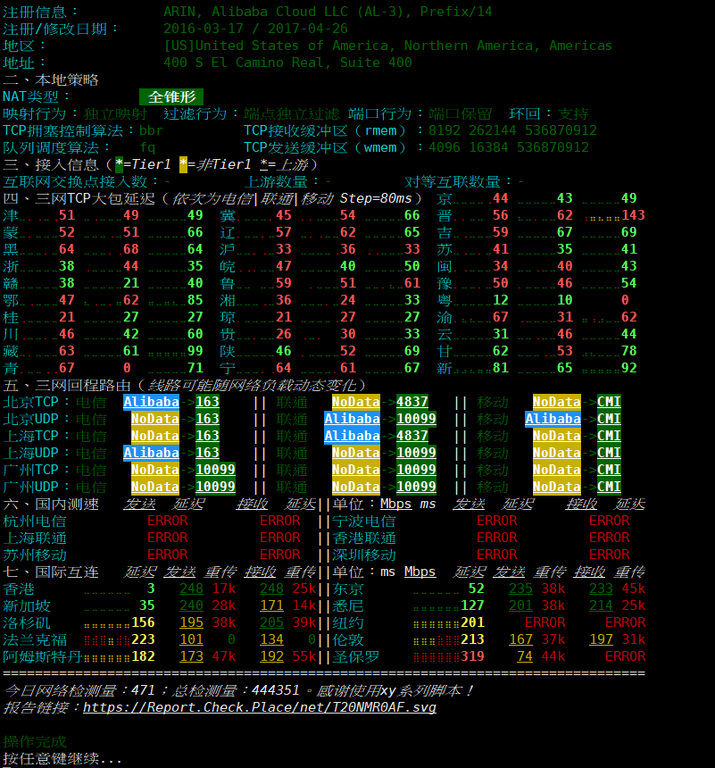
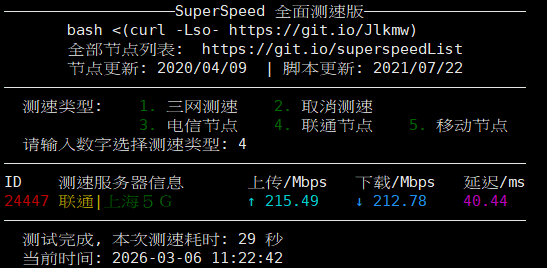
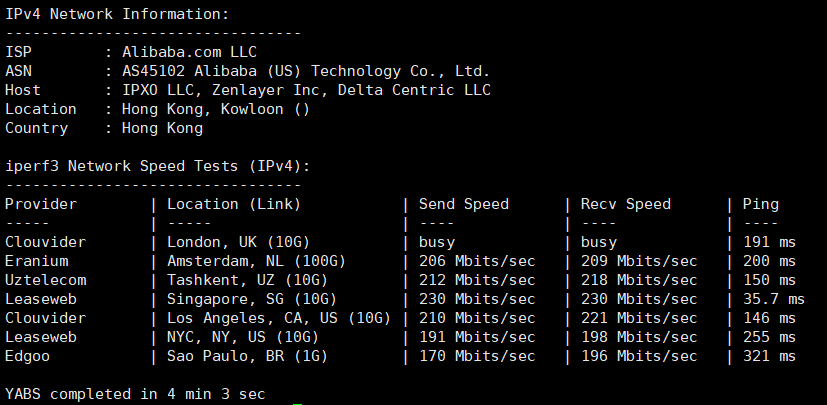
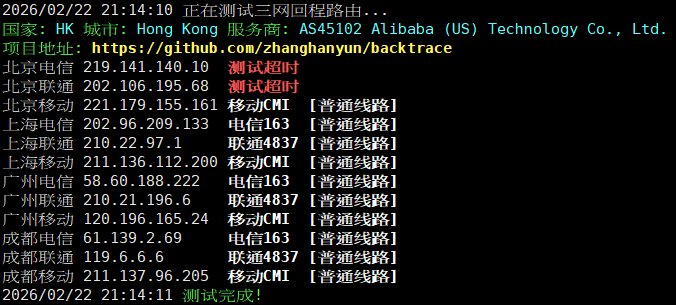
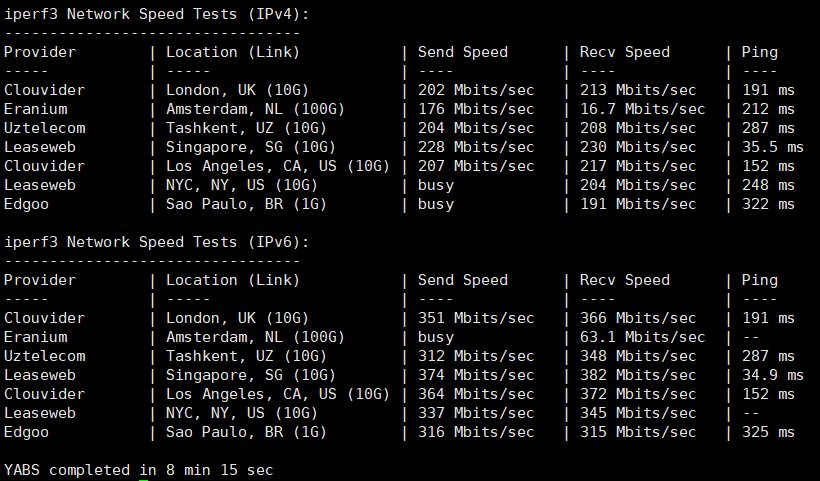
阿里雲 輕量 HK 2C/2G 帶寬200M 通用型 BGP 每月8刀 測速 --------------- 三网回程路由 --------------- 此脚本会显示你的VPS回程路由是经过哪一条线路 (如 CN2、4837、CMI 等),是判断线路品质的入门工具 curl https://raw.githubusercontent.com/zhanghanyun/backtrace/main/install.sh -sSf | sh 2026/03/06 11:18:25 正在测试三网回程路由... 国家: HK 城市: Hong Kong 服务商: AS45102 Alibaba (US) Technology Co., Ltd. 项目地址: https://github.com/zhanghanyun/backtrace 北京电信 219.141.140.10 电信163 [普通线路] 北京联通 202.106.195.68 联通4837 [普通线路] 北京移动 221.179.155.161 移动CMI [普通线路] 上海电信 202.96.209.133 电信163 [普通线路] 上海联通 210.22.97.1 联通4837 [普通线路] 上海移动 211.136.112.200 移动CMI [普通线路] 广州电信 58.60.188.222 联通4837 [普通线路] 广州联通 210.21.196.6 联通4837 [普通线路] 广州移动 120.196.165.24 移动CMI [普通线路] 成都电信 61.139.2.69 联通4837 [普通线路] 成都联通 119.6.6.6 电信163 [普通线路] 成都移动 211.137.96.205 移动CMI [普通线路] 2026/03/06 11:18:26 测试完成! ---------------------------------- KEJILION.SH 科技lion 脚本 ---------------------------------- bash <(curl -sL kejilion.sh) 8 --> 12. mtr_trace 三网回程线路测试 本脚本测试结果为TCP回程路由,非ICMP回程路由 仅供参考,以最新IP段为准 谢谢 8 --> 13. Superspeed 三网测速 8 --> 16. ludashi2020 三网线路测试 8 --> 17. i-abc 多功能测速脚本 --> 18. 测试用例 8 --> 18. NetQuality 网络质量体检脚本 --------------------------------------------------- SuperSpeed 全面测速版 节点更新: 2020/04/09 | 脚本更新: 2021/07/22 --------------------------------------------------- bash <(curl -Lso- https://git.io/Jlkmw) 3. 电信节点 4. 联通节点 5. 移动节点 測不出 ---------------------- 融合怪 脚本 ---------------------- 融合怪 脚本 -> 4. 融合怪单项区(融合怪的单项测试完整版) -> 3. 硬件方面(基础系统信息+CPU+内存+双重磁盘IO测试) curl -L https://github.com/spiritLHLS/ecs/raw/main/ecs.sh -o ecs.sh && chmod +x ecs.sh && bash ecs.sh 4. 融合怪单项区(融合怪的单项测试完整版) -> 6. 三网回程线路+广州三网路由+全国三网延迟 融合怪 脚本 -> 5. 第三方脚本区(同类作者的各种测试脚本) -> 3. 网络测试脚本合集(如三网回程和三网测速等) 15. 本人的ecs-ping三网测ping脚本(自动更新测试节点) 融合怪 脚本 -> 6. 原创区(本脚本独有的一些测试脚本) 3. 三网回程路由测试(预设上海)(平均运行1分钟) ----------------------回程路由--基于nexttrace开源----------------------- 依次测试电信/联通/移动经过的地区及线路,核心程序来自nexttrace,请知悉! 上海电信 202.96.209.133 3.27 ms * DOD 2.37 ms * RFC1918 2.36 ms AS45102 [Taobao] 中国 香港 alibabagroup.com 3.18 ms AS4134 [CHINANET-HK] 中国 香港 CT163-阿里云 chinatelecom.com.cn 电信 25.39 ms AS4134 [CHINANET-BB] 中国 上海 chinatelecom.com.cn 电信 30.38 ms AS4812 [CHINANET-SH] 中国 上海 chinatelecom.cn 电信 27.25 ms AS4812 中国 上海市 chinatelecom.cn 电信 25.54 ms AS4812 [CHINANET-SH] 中国 上海 chinatelecom.cn 电信 上海联通 210.22.97.1 2.58 ms * DOD 3.81 ms * DOD 3.26 ms * [CUG-ASIA] 中国 香港 中国联通(香港) 6.46 ms AS10099 [CUG-BACKBONE] 中国 香港 chinaunicomglobal.com 联通 7.00 ms AS4837 [CU169-BACKBONE] 中国 广东 广州 chinaunicom.cn 11.31 ms AS4837 [CU169-BACKBONE] 中国 广东 广州 I-C chinaunicom.cn 联通 36.09 ms AS17621 [CNCNET-SH] 中国 上海 闵行区 chinaunicom.cn 联通 上海移动 211.136.112.200 2.69 ms * DOD 2.15 ms * RFC1918 3.39 ms AS58453 [CMI-INT] 中国 香港 cmi.chinamobile.com 移动 4.34 ms AS58453 [CMI-INT] 中国 香港 cmi.chinamobile.com 移动 31.43 ms AS9808 [CMNET] 中国 上海 X-I chinamobileltd.com 移动 31.69 ms AS9808 [CMNET] 中国 上海 I-C chinamobileltd.com 移动 33.10 ms AS9808 [CMNET] 中国 上海 chinamobileltd.com 移动 35.37 ms AS24400 [CMNET] 中国 上海 sh.10086.cn 移动 36.94 ms AS24400 [CMNET] 中国 上海 浦东新区 sh.10086.cn 移动 ------------------------------------------------------------------------ 总共花费 : 26 秒 时间 : Fri Mar 6 12:08:58 CST 2026 ------------------------------------------------------------------------ 融合怪 脚本 -> 6. 原创区(本脚本独有的一些测试脚本) 4. 三网回程路由测试(预设北京)(平均运行1分钟) ----------------------回程路由--基于nexttrace开源----------------------- 依次测试电信/联通/移动经过的地区及线路,核心程序来自nexttrace,请知悉! 北京电信 219.141.140.10 1.80 ms * DOD 2.76 ms AS4134 [APNIC-AP] 中国 香港 CT163-阿里云 chinatelecom.com.cn 电信 34.46 ms AS4134 [CHINANET-BB] 中国 北京 X-I chinatelecom.com.cn 44.74 ms AS4847 [CHINATELECOM-BJ] 中国 北京 bj.189.cn 北京联通 202.106.195.68 2.73 ms * DOD 1.96 ms * RFC1918 2.44 ms * [CUG-ASIA] 中国 香港 中国联通(香港) 6.33 ms AS10099 [CUG-BACKBONE] 中国 香港 chinaunicomglobal.com 联通 7.24 ms AS4837 [CU169-BACKBONE] 中国 广东 广州 chinaunicom.cn 联通 37.98 ms AS4837 [CU169-BACKBONE] 中国 北京 chinaunicom.cn 联通 北京移动 221.179.155.161 2.56 ms * DOD 2.31 ms * RFC1918 100.43 ms AS45102 [Taobao] 中国 香港 alibabagroup.com 5.66 ms AS58453 [CMI-INT] 中国 香港 cmi.chinamobile.com 移动 3.45 ms AS58453 [CMI-INT] 中国 香港 cmi.chinamobile.com 移动 38.64 ms AS9808 [CMNET] 中国 北京 X-I chinamobileltd.com 移动 46.47 ms AS9808 [CMNET] 中国 北京 I-C chinamobileltd.com 移动 45.43 ms AS9808 [CMNET] 中国 北京 chinamobileltd.com 移动 49.04 ms AS56048 [CMNET] 中国 北京 bj.10086.cn 移动 ------------------------------------------------------------------------ 总共花费 : 33 秒 时间 : Fri Mar 6 12:32:34 CST 2026 ------------------------------------------------------------------------ 融合怪 脚本 -> 6. 原创区(本脚本独有的一些测试脚本) 5. 三网回程路由测试(预设成都)(平均运行1分钟) ----------------------回程路由--基于nexttrace开源----------------------- 依次测试电信/联通/移动经过的地区及线路,核心程序来自nexttrace,请知悉! 成都电信 61.139.2.69 1.89 ms * DOD 2.31 ms * RFC1918 2.76 ms * RFC1918 2.74 ms * [CUG-ASIA] 中国 香港 中国联通(香港) 3.24 ms AS10099 中国 香港 chinaunicomglobal.com 6.78 ms AS4837 [CU169-BACKBONE] 中国 广东 广州 chinaunicom.cn 41.23 ms AS4837 [CU169-BACKBONE] 中国 四川 成都 chinaunicom.cn 联通 41.96 ms AS4134 [CHINANET-SC] 中国 四川 成都 chinatelecom.com.cn 电信 41.83 ms AS4134 中国 四川 成都 青羊区 chinatelecom.com.cn 电信 成都联通 119.6.6.6 3.69 ms * DOD 2.16 ms AS4134 [CHINANET-HK] 中国 香港 chinatelecom.com.cn 电信 2.96 ms AS4134 [CHINANET-HK] 中国 香港 CT163-阿里云 chinatelecom.com.cn 电信 5.35 ms AS4134 [CHINANET-BB] 中国 广东 广州 chinatelecom.com.cn 电信 12.51 ms AS4134 [CHINANET-BB] 中国 广东 广州 chinatelecom.com.cn 电信 7.90 ms AS4134 [CHINANET-BB] 中国 广东 广州 chinatelecom.com.cn 电信 40.94 ms AS4837 [CU169-BACKBONE] 中国 四川 成都 chinaunicom.cn 60.84 ms AS4837 [UNICOM-SC] 中国 四川 成都 chinaunicom.cn 联通 37.62 ms AS4837 [UNICOM-SC] 中国 四川 成都 chinaunicom.cn 联通 成都移动 211.137.96.205 2.72 ms * DOD 2.73 ms * 中国 香港 3.29 ms * DOD 3.20 ms AS58453 [CMI-INT] 中国 香港 cmi.chinamobile.com 移动 3.25 ms AS58453 [CMI-INT] 中国 香港 cmi.chinamobile.com 移动 8.93 ms AS58453 [CMI-INT] 中国 广东 广州 cmi.chinamobile.com 9.14 ms AS9808 [CMNET] 中国 广东 广州 X-I chinamobileltd.com 移动 15.46 ms AS9808 [CMNET] 中国 广东 广州 I-C chinamobileltd.com 移动 14.87 ms AS9808 [CMNET] 中国 广东 广州 chinamobileltd.com 14.79 ms AS9808 [CMNET] 中国 广东 广州 chinamobileltd.com 移动 15.15 ms AS9808 [CMNET] 中国 四川 成都 chinamobileltd.com 移动 ------------------------------------------------------------------------ 总共花费 : 27 秒 时间 : Fri Mar 6 12:35:37 CST 2026 ------------------------------------------------------------------------ ------------------- YABS 一鍵腳本 ------------------- 只用 iperf3 測試網路速度 curl -sL yabs.sh | bash -s -- -fg


-
Debian 13 自動安全更新 ---------- 前言 ---------- 為了確保系統安全性,建議啟用自動安全更新機制,讓系統能夠定期安裝重要的安全性修補程式 這不僅能減少手動維護的負擔,更能及時防範已知的安全漏洞,提升系統整體安全性 適用環境 作業系統:Debian 13 權限要求:需具備 root 權限或 sudo 權限 網路需求:需能連線至 Debian 官方套件庫 ------------ 設定步驟 ------------ 更新套件列表 apt update 升級現有套件 apt upgrade -y 安裝自動更新套件 apt install unattended-upgrades -y 設定自動安全更新 dpkg-reconfigure unattended-upgrades 將顯示 Automatically download and install stable updates? 選 <Yes> 檢查自動更新服務狀態 systemctl status unattended-upgrades 應顯示 active (running) 測試自動更新機制 透過以下指令手動觸發一次自動更新檢查 unattended-upgrade --dry-run 加上 --dry-run 參數只會模擬執行,不會實際安裝套件 查看自動更新的執行紀錄,確認更新是否順利完成 檢視自動更新紀錄 less /var/log/unattended-upgrades/unattended-upgrades.log -------------- 建議事項 -------------- 定期檢查日誌 ls -la /var/log/unattended-upgrades/ tail -f /var/log/unattended-upgrades/unattended-upgrades.log 建議每週至少檢查一次,確保更新正常執行 測試環境先行 若系統為生產環境,建議先在測試環境驗證自動更新行為 確認自動更新不會影響主要服務運作 設定更新通知 可安裝以下工具加強更新通知與管理 apticron:透過電子郵件通知可用更新 apt install apticron cron-apt:提供更彈性的自動更新排程 apt install cron-apt 留意系統重新開機 部分核心更新可能需要重新開機才能生效 可設定特定時間自動重新開機,或手動處理 監控磁碟空間 確保 /boot 分割區有足夠空間容納新核心 定期清理舊核心 apt autoremove ------------------ 常見問題排除 ------------------ 問題 未自動更新 可能原因 服務未啟動 解決方法 systemctl start unattended-upgrades 問題 套件被保留 可能原因 相依性問題 解決方法 手動執行 apt upgrade apt upgrade 問題 更新失敗 可能原因 網路問題 解決方法 檢查網路連線及套件庫設定
-
Debian 13 安裝Nginx官方版本、更改主機名稱、虛擬主機設定 -------- 前言 -------- 本教學適用Debian 13,假設系統尚未安裝Nginx,改用Nginx官方來源進行安裝與基本設定 為什麼選擇Nginx官方版本? Debian內建的nginx套件版本通常較舊,而官方版本提供: 最新穩定版:取得Nginx官方釋出的當下最新穩定版本 官方維護:由Nginx團隊直接維護與提供安全性更新 生產環境首選:適合需要快速獲得上游更新與修補的正式環境 ------------ 注意事項 ------------ 目錄結構差異 官方版與Debian版在目錄結構上略有不同。官方版預設沒有 sites-available 與 sites-enabled 這兩個用於管理虛擬主機的目錄 本教學將手動建立並整合它們,讓管理方式更直覺 使用者與群組變更 為符合Debian系統習慣與相容性,所有Nginx程序與目錄權限將統一使用 www-data:www-data (Debian預設的Web使用者) ---------------------------------- 準備工作 (更新系統、安裝工具) ---------------------------------- 安裝必要工具 apt update apt install -y curl vim wget gnupg gnupg2 dpkg apt-transport-https lsb-release ca-certificates 下載Nginx官方GPG金鑰 curl -sSLo /usr/share/keyrings/nginx.gpg https://nginx.org/keys/nginx_signing.key 驗證 GPG 金鑰指紋 gpg --show-keys --with-fingerprint /usr/share/keyrings/nginx.gpg 預期輸出: pub xxxxxxxxxxxx uid xxxxxxxxxxxx 安全提醒: 若指紋不符,請立即停止安裝 這可能代表金鑰遭竄改或下載來源異常 驗證金鑰是防範供應鏈攻擊的重要步驟,切勿略過 加入Nginx官方套件來源 echo "deb [arch=$(dpkg --print-architecture) signed-by=/usr/share/keyrings/nginx.gpg] https://nginx.org/packages/debian/ $(lsb_release -sc) nginx" > /etc/apt/sources.list.d/nginx.list 確認內容是否正確 cat /etc/apt/sources.list.d/nginx.list 預期輸出:deb [arch=amd64 signed-by=/usr/share/keyrings/nginx.gpg] https://nginx.org/packages/debian/ trixie nginx 更新套件清單 apt update 建議使用 full-upgrade 以確保依賴關係完整更新 apt full-upgrade -y 安裝nginx apt install -y nginx 安裝完成後,確認版本 nginx -v 應顯示 nginx version: nginx/1.28.x 類似訊息 ---------------------------------- 更改系統主機名稱 (Hostname) ---------------------------------- 若希望主機名稱與網站域名一致,可執行 hostnamectl set-hostname 域名.com 登出再登入即可生效 登出SSH exit 重新登入SSH 應顯示 Linux 域名.com 6.12.73+deb13-amd64 #1 SMP PREEMPT_DYNAMIC Debian 6.12.73-1 (2026-02-17) x86_64 確認主機名稱已更改 hostname ----------------------- 同步更新 /etc/hosts ----------------------- 更改主機名稱為純本機設定,與DNS解析無關,不影響網站是否可以對外存取 若系統同時使用 /etc/hosts,建議也同步更新其中的對應設定 編輯 vi /etc/hosts 找到原本的主機名稱那行 (通常格式為 127.0.1.1 舊主機名稱),將名稱改為新域名 127.0.1.1 域名.com 這樣可避免部分程式無法解析主機名稱的警告 儲存檔案並離開vi編輯器 按 Esc,輸入 :wq,按 Enter -------------------------------------------------- 修改Nginx執行使用者為 www-data -------------------------------------------------- Nginx官方版預設以 nginx 使用者執行,Debian套件則使用 www-data 為與Debian習慣一致,並避免日後與PHP-FPM等服務的權限衝突,建議統一改為 www-data 編輯 vi /etc/nginx/nginx.conf 找到最頂端的 user nginx; (通常是第一行或第二行),將其改為 user www-data; 儲存檔案並離開vi編輯器 按 Esc,輸入 :wq,按 Enter 儲存後測試 nginx -t 說明: 若未修改此設定,Nginx worker process 將以 nginx 使用者身份執行 而網站目錄擁有者為 www-data,兩者不符將導致 403 Forbidden 錯誤 ------------------------------------------------- 建立 Nginx 虛擬主機 (Server Block) 管理結構 ------------------------------------------------- Nginx官方版不含 Debian風格的虛擬主機管理目錄 (sites-available / sites-enabled),需手動建立 --------------------------------------------- 建立 sites-available 與 sites-enabled 目錄 --------------------------------------------- mkdir -p /etc/nginx/sites-available mkdir -p /etc/nginx/sites-enabled 說明:-p 參數允許建立多層目錄,若目錄已存在也不會報錯 -------------------------------------- 修改主設定檔,載入 sites-enabled -------------------------------------- 編輯 vi /etc/nginx/nginx.conf 在 http { ... } 區塊的結尾附近,可放在最後一個 } 之前,加入以下這行 include /etc/nginx/sites-enabled/*.conf; 儲存檔案並離開vi編輯器 按 Esc,輸入 :wq,按 Enter 請確認是加在 http { } 區塊內部,而非區塊外面 因為Nginx官方版不包含此設定,必須手動加入,否則虛擬主機設定檔不會被載入,網站將無法正常運作 測試 nginx -t ---------------------------------------------------------------------------- 停用 Nginx官方 預設頁面 /etc/nginx/conf.d/default.conf 改為放在 Debian風格 預設頁面 /etc/nginx/sites-available/default.conf ---------------------------------------------------------------------------- 停用官方 預設頁面 mv /etc/nginx/conf.d/default.conf /etc/nginx/conf.d/default.conf.disabled 改放在 Debian風格 預設頁面 /etc/nginx/sites-available/default.conf 編輯 vi /etc/nginx/sites-available/default.conf 複製貼上以下內容 # Debian default.conf 預設頁面,準備改為 phpMyAdmin 專用,要改 port,要限制IP才能連入 # Default server configuration # server { listen 80 default_server; listen [::]:80 default_server; root /var/www/html; # Add index.php to the list if you are using PHP index index.html index.htm index.php; server_name _; location / { # First attempt to serve request as file, then # as directory, then fall back to displaying a 404. try_files $uri $uri/ =404; } } 儲存檔案並離開vi編輯器 按 Esc,輸入 :wq,按 Enter --------------------------- 啟用 預設頁面 (建立軟連結) --------------------------- ln -s /etc/nginx/sites-available/default.conf /etc/nginx/sites-enabled/default.conf ----------------------------------------------------------- 修正 預設頁面 網站目錄與檔案權限 (避免 403 Forbidden) ----------------------------------------------------------- 建立 預設頁面 根目錄 mkdir -p /var/www/html chown -R www-data:www-data /var/www/html chmod -R 755 /var/www/html 啟動 systemctl start nginx 確認 ps aux | grep nginx | grep -v grep 應看到 worker process 的左側顯示為 www-data 如果看到 worker process 的左側還是顯示為 nginx 試試重開機 reboot ----------------------------- 建立 虛擬主機 網站根目錄 ----------------------------- 建立網站根目錄 mkdir -p /var/www/域名.com ----------------------- 建立 虛擬主機 設定檔 ----------------------- 建立 域名.com.conf vi /etc/nginx/sites-available/域名.com.conf 貼上以下內容 (請將 域名.com 替換為你的實際域名) server { listen 80; server_name 域名.com; root /var/www/域名.com; index index.html index.htm; location / { try_files $uri $uri/ =404; } # 記錄存取與錯誤日誌 (便於除錯) access_log /var/log/nginx/域名.com.access.log; error_log /var/log/nginx/域名.com.error.log; } 儲存檔案並離開vi編輯器 按 Esc,輸入 :wq,按 Enter 說明: access_log 與 error_log 雖非必要,但強烈建議加入,便於後續排查問題 若有多個網站,每個網站各自建立一個 .conf 檔案,清楚分離設定,方便維護與停用個別網站 -------------------------- 啟用網站 (建立軟連結) -------------------------- ln -s /etc/nginx/sites-available/域名.com.conf /etc/nginx/sites-enabled/域名.com.conf 說明: 使用軟連結 (symlink) 的好處是:日後若要暫時關閉網站,只需刪除 sites-enabled 中的連結,設定檔仍會保留在 sites-available 中,方便日後重新啟用 日後若要暫時關閉網站,只需 rm 刪除 sites-enabled 中的連結 rm /etc/nginx/sites-enabled/域名.com.conf ------------------------------------------------------------- 修正 虛擬主機 網站目錄與檔案權限 (避免 403 Forbidden) ------------------------------------------------------------- 將網站目錄與檔案擁有者改為 www-data (與 nginx.conf 的 user 設定一致) chown -R www-data:www-data /var/www/域名.com chmod -R 755 /var/www/域名.com 啟動 systemctl start nginx 確認 ps aux | grep nginx | grep -v grep 應看到 worker process 的左側顯示為 www-data 說明: 如果未來上傳PHP或其他動態網站,可能需要根據實際需求調整權限 (例如將某些目錄設為 775) 755 是一個安全且通用的起始設定 確認 nginx.conf 中的 user 已設為 www-data,否則即使目錄權限正確,Nginx仍可能因使用者不符而產生 403 錯誤 ------------------------- 測試與重新載入Nginx ------------------------- 每次修改設定後,務必先測試設定語法是否正確 nginx -t 若顯示 nginx: the configuration file /etc/nginx/nginx.conf syntax is ok nginx: configuration file /etc/nginx/nginx.conf test is successful 代表設定無誤,即可繼續 重新載入設定 systemctl reload nginx 說明: 請使用 reload (重新載入設定),而非 restart (重新啟動服務) reload不會中斷現有連線;restart會短暫中斷所有服務,在生產環境中應盡量避免 若 nginx -t 顯示錯誤,Nginx 會指出是哪個檔案的哪一行有問題,根據提示修正後再次執行 nginx -t 確認,通過後再 reload ------------------------- 建立 虛擬主機 測試頁面 ------------------------- 在網站目錄中,新增一個index.html vi /var/www/網域.com/index.html 貼上以下內容 <!DOCTYPE html> <html lang="zh-Hant"> <head> <meta charset="UTF-8"> <meta name="viewport" content="width=device-width, initial-scale=1.0"> <title>測試頁面</title> </head> <body> <h1>Nginx 運作正常</h1> <p>若你看到此頁面,代表 Nginx 已成功安裝並正確設定。</p> </body> </html> 儲存檔案並離開vi編輯器 按 Esc,輸入 :wq,按 Enter ----------------------------------- 防火牆設定 (開放 80 / 443 Port) ----------------------------------- 之前的步驟已啟用iptables防火牆,需開放 HTTP 80 與 HTTPS 443 連接埠 編輯防火牆腳本 vi /usr/local/bin/firewall.sh # 3. 允許對內連線的 TCP 通訊埠(支援來源 IP 限制與反向排除) IN_TCP_PORTALLOWED="22,你的管理員IPv4 80 443" 儲存檔案並離開vi編輯器 按 Esc,輸入 :wq,按 Enter 重新套用防火牆規則 bash /usr/local/bin/firewall.sh 檢查規則是否生效 iptables -L INPUT -n --line-numbers | grep -E "80|443" 應顯示為 29 WEB_ACCEPT tcp -- 0.0.0.0/0 0.0.0.0/0 tcp dpt:80 ctstate NEW 30 WEB_ACCEPT tcp -- 0.0.0.0/0 0.0.0.0/0 tcp dpt:443 ctstate NEW 重要: 若使用雲端服務商 (如 GCP、AWS、Azure),除了系統內的 iptables,還需在雲端控制台的「安全性群組」或「防火牆規則」中開放 80/443 連接埠,兩者都需要設定,缺一不可 日後若要安裝SSL憑證,443 連接埠必須事先開放,否則申請憑證的驗證流程會失敗 ----------------------- 開機啟動與檢查狀態 ----------------------- 開機自動啟動 systemctl enable nginx 重新啟動Nginx systemctl restart nginx 檢查服務狀態 systemctl status nginx 正常應顯示 Active: active (running) 若服務無法啟動,查看錯誤 journalctl -xeu nginx 常見問題:設定檔語法錯誤、連接埠被其他服務佔用 (可用 ss -tlnp | grep :80 確認) ------------------------------ 驗證 虛擬主機 網站是否正常 ------------------------------ 開啟瀏覽器,輸入 http://域名.com/index.html 應可看到剛才建立的測試頁面 現代瀏覽器較嚴格,非 https 的頁面可能無法進入,當發現是這原因時,換個瀏覽器試試,或者使用SSH在伺服器本機測試 curl -I http://域名.com/ --------------------------- 驗證 預設頁面 是否正常 --------------------------- 開啟瀏覽器,輸入 http://伺服器IP/ 應可看到修改後的 Debian風格 預設頁面 上面步驟對此 預設頁面 沒加入 index.html 此時應顯示 404 Not Found 在伺服器本機用 curl 測試 (不依賴DNS解析) curl -I http://localhost/ curl -I http://IP/ 應回傳 HTTP/1.1 403 Forbidden (預設頁面 沒設定 index.html) curl -I http://域名.com/ 應回傳 HTTP/1.1 200 OK (虛擬主機,有設定 index.html) ------------------------------------------------- 設定 logrotate 自動輪替日誌 (避免日誌爆滿) ------------------------------------------------- 為避免 Nginx 的存取日誌 (access log) 和錯誤日誌 (error log) 無限增長,耗盡硬碟空間,需設定 logrotate 自動管理 建立一個新的設定檔 vi /etc/logrotate.d/nginx 貼上以下內容 /var/log/nginx/*.log { daily missingok rotate 14 compress delaycompress notifempty create 640 www-data adm sharedscripts postrotate if [ -f /var/run/nginx.pid ]; then kill -USR1 `cat /var/run/nginx.pid` fi endscript } 儲存檔案並離開vi編輯器 按 Esc,輸入 :wq,按 Enter 說明: 這會讓系統每天輪替一次日誌,保留 14 天的紀錄,並壓縮舊檔 手動測試 logrotate 是否設定正確 (不實際輪替,僅模擬) logrotate -d /etc/logrotate.d/nginx ------------------ 重開機再次驗證 ------------------ 重開機 reboot 重開機再次驗證 服務狀態 systemctl status nginx 正常應顯示 Active: active (running) 測試設定語法是否正確 nginx -t ------------- 補充 ------------- sites-enabled 載入 官方版 Nginx 預設不載入,務必手動加入 include www-data 權限 若未設定目錄擁有者,容易出現 403 Forbidden nginx -t 每次修改設定後都應測試,避免設定錯誤導致服務中斷 reload vs restart 生產環境應使用 reload 保留現有連線 防火牆雙層檢查 系統 + 雲端防火牆都要開放 80/443 Port被佔用 查找 ss -tlnp | grep :80 Hash Bucket Size:若你的域名非常長,啟動Nginx時可能會報錯 server_names_hash_bucket_size 此時需在 nginx.conf 的 http 區塊中取消該行註解並調大數值 (如 64) 編輯 nginx.conf vi /etc/nginx/nginx.conf 在 http {} 區塊裡面加入或取消註解 http { ......... server_names_hash_bucket_size 64; ......... } 儲存檔案並離開vi編輯器 按 Esc,輸入 :wq,按 Enter 注意: 必須放在 http {} 區塊中 不可以放在 server {} 裡面 不要重複定義多次 一般網站 建議數值 64 長子網域 建議數值 128 大量 vhost 建議數值 128 ~ 256 不建議無限放大,因為這會增加記憶體使用量
-
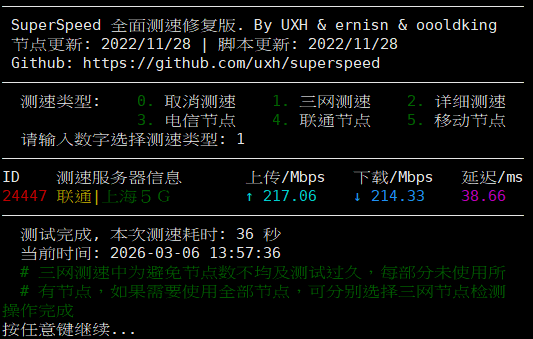
VPS/云主机的三网测速 (电信、联通、移动) 当你的 VPS/云主机 服务的对象主要是国内用户时,测试其三网连线速度就变得非常重要 --------------- 三网回程路由 --------------- 此脚本会显示你的VPS回程路由是经过哪一条线路 (如 CN2、4837、CMI 等),是判断线路品质的入门工具 curl https://raw.githubusercontent.com/zhanghanyun/backtrace/main/install.sh -sSf | sh --------------------------------------------------- SuperSpeed 全面测速版 节点更新: 2020/04/09 | 脚本更新: 2021/07/22 --------------------------------------------------- bash <(curl -Lso- https://git.io/Jlkmw) 测速类型: 1. 三网测速 2. 取消测速 3. 电信节点 4. 联通节点 5. 移动节点 请输入数字选择测速类型: 直接选择 1. 三网测速 或者 三网 分别一个接一个的测试 3. 电信节点 4. 联通节点 5. 移动节点 结果的节点数量会不一样 -------------- 融合怪 脚本 -------------- 4. 融合怪单项区(融合怪的单项测试完整版) -> 6. 三网回程线路+广州三网路由+全国三网延迟 curl -L https://github.com/spiritLHLS/ecs/raw/main/ecs.sh -o ecs.sh && chmod +x ecs.sh && bash ecs.sh 如果你已下载并安装融合怪,就直接敲入脚本名称 bash ecs.sh 5. 第三方脚本区(同类作者的各种测试脚本) -> 3. 网络测试脚本合集(如三网回程和三网测速等) 1. zhanghanyun的backtrace三网回程线路检测脚本 2. zhucaidan的mtr_trace三网回程线路测脚本 3. 基于besttrace回程路由测试脚本(带详情信息,可能有bug) 4. 基于besttrace回程路由测试脚本(二开整合输出,可能有bug) 5. 基于nexttrace回程路由测试脚本(第三方IP库,更推荐) 6. 由Netflixxp维护的四网路由测试脚本 7. 原始作者维护的superspeed的三网测速脚本 8. 未知作者修复的superspeed的三网测速脚本 9. 由sunpma维护的superspeed的三网测速脚本 10. 原始作者维护的hyperspeed的三网测速脚本(测速内核不开源) 11. 原始作者维护的多功能测速脚本(部分测速内核不开源) 12. 综合速度测试脚本(全球的测速节点) 13. 本人的ecs-net三网测速脚本(自动更新测速节点,对应 speedtest.net) 14. 本人的ecs-cn三网测速脚本(自动更新测速节点,对应 speedtest.cn) 15. 本人的ecs-ping三网测ping脚本(自动更新测试节点) 如果你已下载并安装融合怪,就直接敲入脚本名称 bash ecs.sh 6. 原创区(本脚本独有的一些测试脚本) -> 2. 三网回程路由测试(预设广州)(平均运行1分钟) 3. 三网回程路由测试(预设上海)(平均运行1分钟) 4. 三网回程路由测试(预设北京)(平均运行1分钟) 5. 三网回程路由测试(预设成都)(平均运行1分钟) 6. 自定义IP的回程路由测试(基于besttrace)(准确率高,但可能有bug) 7. 自定义IP的回程路由测试(基于nexttrace)(第三方IP库) 8. 自定义IP的IP质量检测(平均运行10~20秒) 13. ecs-net三网测速脚本(自动更新测速节点,对应 speedtest.net) 14. ecs-cn三网测速脚本(自动更新测速节点,对应 speedtest.cn) 15. ecs-ping三网测ping脚本(自动更新测试节点)
-
VPS/雲主機的國際測速 當你的 VPS/雲主機 服務的對象包含國際用戶時,測試其對外連線速度就變得非常重要 以下介紹兩款常見的測速工具,並提供實用指令與使用建議 ------------------- YABS 一鍵腳本 ------------------- 若只想用 iperf3 測試網路速度 curl -sL yabs.sh | bash -s -- -fg 說明: 僅執行 iperf3 測速,不包含硬碟與硬體測試 適合快速了解主機的國際頻寬表現 支援多點測試,結果較為客觀 -------------------------------------- speedtest-cli (基於 Speedtest.net) -------------------------------------- 安裝方式 apt update 安裝 speedtest-cli apt install speedtest-cli 伺服器當地的測速,完整詳細輸出模式 speedtest-cli 會顯示: ISP名稱 IP位址 測速伺服器 (位置與距離) Ping 值 下載速度 上傳速度 適用情境: 網路問題診斷 測速記錄與除錯 初次測試或需完整資訊時 伺服器當地的測速,精簡輸出模式 speedtest-cli --simple 只顯示三個關鍵數值: Ping Download Upload 適合用途 腳本自動化 系統監控 cron排程 log收集 列出可用測速節點 speedtest-cli --list 指定測速伺服器 speedtest-cli --server <伺服器ID> 範例: speedtest-cli --server 73629
-
Debian 13 查詢執行的進程 (Process) + 管理 + 維運 ------ 前言 ------ 在 Linux 系統管理中,掌握「目前系統正在執行哪些進程(Process)」是基本且重要的技能。無論是: 排查 CPU 或記憶體資源占用過高 找出異常或惡意進程 確認某項服務是否正常啟動 分析系統效能瓶頸 都需要依賴進程查詢工具 ------------------------- 什麼是進程 (Process)? ------------------------- 進程是作業系統分配資源、排程執行的基本單位,每個正在執行的程式都是一個或多個進程 每個進程都有唯一的 PID (Process ID),以及一個父進程 PPID (Parent PID) 進程之間形成樹狀結構,systemd (PID 1) 是所有用戶空間進程的根 進程狀態說明 Linux 進程有以下幾種狀態,在 top / ps 的狀態欄 (S 欄) 中以單一字母表示: 代碼 狀態名稱 說明 R 執行中 (Running) 正在CPU上執行,或在執行佇列中等待 S 休眠 (Sleeping) 可中斷休眠,等待事件 (如 I/O 完成),可被訊號喚醒 D 不可中斷休眠 通常是等待磁碟 I/O,不可被訊號中斷,出現大量 D 表示 I/O 瓶頸 Z 殭屍 (Zombie) 已結束但父程序尚未回收,佔用 PID,不佔 CPU/記憶體 T 已停止 (Stopped) 收到 SIGSTOP 或 SIGTSTP (Ctrl+Z) 而暫停 I 閒置 (Idle) 核心執行緒閒置中,Debian 新版核心出現 -------------------------------- 使用 top 指令 (即時動態監控) -------------------------------- top 是 Linux 系統預設安裝的即時進程監控工具 啟動後會以全螢幕模式持續更新,顯示 CPU 使用率、記憶體用量、進程列表等資訊,預設每 3 秒刷新一次 基本指令 top top介面說明 系統摘要區 (前5行) 系統時間、開機時間、登入人數 CPU 使用率 (us:使用者、sy:系統、ni:優先級調整、id:閒置、wa:I/O 等待、hi:硬體中斷、si:軟體中斷、st:虛擬機器偷取時間) 記憶體使用情況 (總量、已用、空閒、緩衝/快取) Swap 使用情況 (總量、已用、空閒、可用記憶體) 程序列表區 PID:程序 ID USER:執行程序的用戶 PR:優先級 NI:Nice 值 (優先級調整) VIRT:虛擬記憶體使用量 RES:實際實體記憶體使用量 SHR:共享記憶體使用量 S:程序狀態 (R:執行中、S:休眠、D:不可中斷休眠、Z:殭屍、T:停止) %CPU:CPU 使用率 %MEM:記憶體使用率 TIME+:累積 CPU 使用時間 COMMAND:程序名稱 常用操作按鍵 按鍵 功能說明 q 離開 top h 顯示說明 k 終止程序 (需輸入 PID) u 只顯示特定用戶的程序 M 依記憶體使用率排序 P 依 CPU 使用率排序 N 依 PID 排序 T 依累積時間排序 1 顯示各別 CPU 核心狀態 c 切換顯示完整指令路徑 space 立即刷新畫面 d 或 s 變更刷新間隔 (秒) r 調整 Nice 值 f 進入欄位管理畫面 (可新增/移除顯示欄位) W 儲存目前的 top 設定到 ~/.toprc 進階使用技巧 只顯示特定用戶的程序 top -u username 設定更新頻率 (單位:秒) top -d 3 在批次模式下執行一次後結束 (適合寫入腳本) top -b -n 1 監控特定 PID top -p 1234,5678 搭配 pgrep 動態監控特定程序 top -p $(pgrep -d',' nginx) 建議 top 的設定會儲存在 ~/.toprc。按 W 可儲存目前設定,下次啟動時自動套用 ------------------------------- 使用 htop 指令 (增強版 top) ------------------------------- htop 是 top 的加強版,提供彩色化介面、滑鼠支援、更直覺的操作方式,以及樹狀進程顯示 它不是系統預設安裝的工具,需要手動安裝 更新套件庫 apt update 安裝 htop apt install htop 基本指令 htop htop 特色功能 彩色介面:直觀顯示不同類型的資訊,CPU 條以不同顏色區分 user/system/nice/I/O wait 滑鼠支援:可直接點擊排序欄位、選取進程、按選單按鈕 樹狀結構:按 F5 顯示進程的父子關係,一目了然 垂直/水平捲動:可查看完整的指令列 進程標記:可同時標記多個進程進行批次操作 圖形化顯示:CPU、記憶體、Swap 使用條 (可在設定中調整顯示內容) 即時搜尋:按 F3 可即時過濾搜尋進程名稱 常用操作按鍵 按鍵 功能說明 F1 顯示說明 F2 進入設定 (可調整顯示欄位、顏色主題) F3 搜尋程序名稱 F4 過濾程序 (只顯示符合條件的) F5 切換樹狀檢視 (顯示父子關係) F6 選擇排序方式 F7 / F8 調整 Nice 值 (F7 降低 / F8 提高優先級) F9 終止程序 (可互動選擇訊號類型) F10 離開 htop 空白鍵 標記/取消標記進程 (可批次操作) u 切換顯示特定用戶的程序 t 切換樹狀模式 I 反轉排序方向 H 切換顯示/隱藏使用者執行緒 K 切換顯示/隱藏核心執行緒 實用參數範例 只顯示特定用戶的程序 htop -u username 以樹狀結構啟動 htop -t 依 CPU 使用率排序啟動 htop --sort-key PERCENT_CPU 建議 htop 的設定儲存在 ~/.config/htop/htoprc 按 F2 進入設定介面,可調整顯示欄位、顏色主題、Meter 顯示方式,並選擇在啟動時預設使用樹狀檢視 設定會在按 F10 離開時自動儲存 --------------------------- 使用 ps 指令 (靜態查詢) --------------------------- ps (Process Status) 是以快照方式列出進程清單的工具,執行後立即輸出當下的進程狀態並退出,不像 top / htop 那樣持續刷新 ps 非常適合與其他指令搭配,例如 grep、awk,或在 Shell 指令稿中使用 基本用法 顯示目前終端機的程序 ps 顯示所有程序 ps -e 或 ps -A 完整程序列表 (最常用) ps aux 參數說明: a:顯示所有終端機的程序 u:以用戶為導向顯示詳細資訊 x:顯示沒有控制終端的程序 顯示程序樹 (包含子程序) ps -axjf 或 ps -ef --forest 參數說明: -a:顯示所有終端機的程序 -x:顯示沒有控制終端的程序 -j:使用工作格式 (jobs format) f:以樹狀結構顯示 ------------------ 自訂顯示欄位 ------------------ 只顯示特定欄位,並依 CPU 排序 ps -eo pid,ppid,user,cmd,%cpu,%mem --sort=-%cpu 顯示完整指令路徑 ps -ef 顯示進程啟動時間 ps -eo pid,ppid,user,start,time,cmd --sort=start ---------------- 常用過濾技巧 ---------------- ---------------- 依程序名稱搜尋 ---------------- ps aux | grep nginx 排除 grep 本身 ps aux | grep nginx | grep -v grep 更專業的寫法 ps aux | grep '[n]ginx' ------------- 依用戶過濾 ------------- ps -u username 顯示 root 用戶的程序 ps -U root -u root ------------- 依 PID 查詢 ------------- ps -p 1234 ps -p 1234,5678 ---------------------------- 顯示特定程序的所有執行緒 ---------------------------- ps -L -p 1234 ---------------- 進階過濾範例 ---------------- 顯示所有殭屍進程 ps aux | awk '$8=="Z"' 顯示CPU使用率超過 50% 的進程 ps aux --sort=-%cpu | awk '$3>50' 查詢特定指令的 PID (輸出只有數字,適合腳本) ps -C nginx -o pid= 依記憶體使用排序,取前10名 ps aux --sort=-%mem | head -11 -------------------------------- lsof 查詢連接埠與開啟的檔案 -------------------------------- lsof 可以顯示系統中所有開啟的檔案 (在Linux中,網路連接、Socket、設備也都是「檔案」) 想知道是哪個程式佔用了特定連接埠,lsof 是最直接的工具 安裝 lsof apt install lsof 基本用法 查詢佔用 TCP/UDP port 80 的程序 lsof -i :80 查詢特定協定 lsof -i tcp:22 lsof -i udp:53 顯示所有監聽中的連接埠 (-P 不解析埠號名稱,-n 不解析主機名) lsof -i -P -n | grep LISTEN 警告 lsof 需要 root 或 sudo 權限才能查看所有進程的連接。一般使用者只能看到自己的程序 其他實用查詢 查詢某個檔案被哪些程序使用 lsof /var/log/syslog 查詢某個用戶開啟的檔案 lsof -u username 查詢某個程序開啟的檔案 lsof -p 1234 查詢程序正在監聽哪些 port (結合 netstat) netstat -tulpn | grep :80 或使用較新的 ss 指令 ss -tulpn | grep :80 注意 現代Debian系統中,ss 指令 (來自 iproute2 套件) 已取代 netstat 成為推薦工具 若 netstat 未安裝,可執行:apt install net-tools 安裝,或改用 ss -------------- 終止進程 kill -------------- 終止進程最常用的三種方式:使用 PID、使用程序名稱、使用 htop 互動介面 在動手之前,建議先了解Linux訊號機制 Linux 訊號(Signal)說明 訊號名稱 數值 說明 TERM (15) 15 正常終止(預設,程序有機會清理後退出) HUP (1) 1 重新載入設定檔(不停止程序,常用於 nginx / sshd) INT (2) 2 中斷程序(等同 Ctrl+C) KILL (9) 9 強制終止(無法被忽略,最後手段) STOP (19) 19 暫停程序(程序仍在記憶體中,可用 CONT 恢復) CONT (18) 18 繼續已暫停的程序 USR1 (10) 10 用戶自定義訊號(許多程序用於重開日誌) USR2 (12) 12 用戶自定義訊號(依程式而定) 警告 kill -9 (SIGKILL) 是最後手段 SIGKILL 強制由核心終止進程,程序無法進行任何清理動作,可能造成資料遺失、鎖定檔未釋放、資料庫損毀 請優先使用 SIGTERM (kill -15 或直接 kill),給程序機會優雅地關閉 方法一:使用 PID 正常終止(預設,等同 kill -15 或 kill -TERM) kill PID 強制終止(最後手段) kill -9 PID 重新載入設定(不停止服務,常用於 nginx、sshd) kill -HUP PID 終止多個 PID kill 1234 5678 9012 方法二:使用程序名稱 pkill:依名稱模糊匹配(部分符合即可) pkill nginx 匹配完整指令(包含參數) pkill -f 'python script.py' 只終止特定用戶的程序 pkill -u username nginx killall:完全匹配名稱 killall nginx killall -9 nginx 注意 pkill 和 killall 的差別:pkill 使用正規表達式(regex)進行模糊匹配;killall 需要完全符合程序名稱 使用 pkill -f 可以匹配完整指令列,當程序名稱相同但啟動參數不同時很有用 方法三:使用 htop 互動介面 在清單中選取目標進程後,按 F9 選擇訊號類型 htop ------------------------- 安全終止的最佳實務 ------------------------- 建議按以下順序嘗試 1.優先使用服務管理工具(自動處理依賴關係) systemctl stop nginx 2.使用正常終止,讓程序自行清理 kill PID 3.等待幾秒後確認(若程序仍存在再考慮下一步) ps -p PID 4.最後才用強制終止 kill -9 PID ----------------------- 進階應用與實用技巧 ----------------------- 即時監控特定程序 使用 watch 搭配 ps watch -n 1 'ps aux | grep nginx' 每秒更新一次,適合快速監控服務狀態 使用 top 過濾特定進程 top -p $(pgrep -d',' nginx) 僅顯示指定的PID 自訂監控腳本 (適合嵌入日誌) while true; do clear echo "=== $(date) ===" ps aux --sort=-%cpu | head -20 sleep 2 done 查詢 /proc 目錄 (進階分析) /proc 是虛擬檔案系統,內含每個進程的執行狀態: 查看執行檔路徑 ls -l /proc/PID/exe 查看開啟的檔案 ls -l /proc/PID/fd 查看環境變數 cat /proc/PID/environ | tr '\0' '\n' 查看記憶體映射 cat /proc/PID/maps 查看詳細統計 cat /proc/PID/status 資源排序快速指令 前10名CPU使用率 ps aux --sort=-%cpu | head -11 前10名記憶體使用率 ps aux --sort=-%mem | head -11 前10名累積CPU時間 ps aux --sort=-time | head -11 使用 pgrep 依名稱取得PID pgrep 是搜尋進程 PID 的專用工具,比 ps aux | grep 更簡潔: 取得nginx的所有PID pgrep nginx 顯示PID和進程名稱 pgrep -la nginx 只匹配精確名稱 (非子字串) pgrep -x nginx 搭配 top 使用 top -p $(pgrep -d',' nginx) ---------------------------- btop 現代化圖形化監控 ---------------------------- btop 是比 htop 更現代化的互動式系統監控工具,提供圖形化的CPU、記憶體、網路、磁碟使用率圖表,以及可自訂主題的美觀介面 Debian 13 的官方倉庫已收錄 btop 安裝 btop apt install btop 使用 btop btop btop 特色 圖形化 CPU、記憶體、網路、磁碟的即時折線圖 滑鼠支援,可點擊操作 可自訂顏色主題(按 ESC 進入選單) 進程樹狀顯示 可篩選進程、依各種欄位排序 顯示網路介面流量(上傳/下載速率) 顯示磁碟讀寫速率 注意 若系統資源有限,btop 的資源消耗比 htop 略高 在嵌入式系統或極低效能環境中,建議仍使用 top 或 htop ------------------------- 除錯流程建議 (維運篇) ------------------------- 當系統異常時,建議依序排查: 1. 快速檢視整體狀況 htop 或 top,按 1 查看各核心使用率 2. 找出耗用資源的進程 ps aux --sort=-%cpu | head -11 ps aux --sort=-%mem | head -11 在 htop 中可按 F6 排序,或按 P (CPU)、M (記憶體) 3. 深入分析特定進程 完整進程資訊 ps -fp PID 查看執行檔路徑 (確認是哪個程式) ls -l /proc/PID/exe 查看開啟的檔案 (找出可能的 I/O 來源) ls -l /proc/PID/fd 查看環境變數 (確認配置是否正確) cat /proc/PID/environ | tr '\0' '\n' 查看執行緒數量 ps -L -p PID | wc -l 4. 檢查服務狀態 查看服務狀態 (含最近日誌) systemctl status nginx 即時查看服務日誌 journalctl -u nginx -f 查看服務最近 50 行日誌 journalctl -u nginx -n 50 5. 檢查系統日誌 系統日誌 tail -f /var/log/syslog 核心訊息 (驅動程式錯誤、OOM killer 等) dmesg | tail -20 含時間戳的錯誤訊息 dmesg -T | grep -i error 6. 決定處理方式 正常但資源過高:調整參數或重啟服務 異常來源不明:先記錄再終止,並找出根源 疑似惡意程式:隔離網路後分析,必要時重建系統 ------------------ 常見問題與排解 ------------------ Q1: CPU滿載但找不到高CPU進程 可能原因: Kernel thread (核心執行緒) I/O wait (I/O 等待) 中斷處理 (IRQ) 隱藏程序 (rootkit) 檢查方法: 在 top 中按 1 查看各核心使用率,觀察 wa 值是否過高 (I/O 等待問題) top 查看 I/O 統計 (需安裝 iotop) apt install iotop iotop -o 查看中斷分佈 cat /proc/interrupts 查看核心執行緒,以方括號表示 ps aux | grep '\[' 使用 perf 分析 CPU 熱點 apt install linux-perf perf top Q2: 記憶體不足但找不到高記憶體進程 可能原因: 快取佔用 (正常現象) 核心記憶體洩漏 共享記憶體未釋放 檢查方法: 查看記憶體詳細資訊 free -h cat /proc/meminfo 查看核心資料結構記憶體 slabtop 查看共享記憶體 ipcs -m 查看 OOM 紀錄 journalctl -k | grep -i 'oom\|killed' 注意:free -h 中的 available 才是真正可用記憶體,free 欄位小不代表記憶體不足。Linux 會積極使用空閒記憶體作為快取 Q3: 殭屍進程過多 可能原因: 父進程未正確回收子進程(wait() 呼叫缺失) 程式設計錯誤 檢查與處理: 找出殭屍進程 ps aux | awk '$8=="Z"' 查看父進程 ps -fp PPID 嘗試重啟父進程 systemctl restart 服務名稱 注意:少量殭屍(1~2 個)為暫時現象,大量才需處理。殭屍僅佔用 PID,不佔 CPU/記憶體,只有當 PID 耗盡時才會影響系統。若無法清除,最後手段是重開機 Q4: 無法終止進程 可能原因: 程序處於不可中斷睡眠狀態(D state) 權限不足 核心執行緒 解決方法: 確認進程狀態 ps aux | grep PID 依序嘗試 正常終止 kill -15 PID sleep 5 強制終止 kill -9 PID 警告:D 狀態進程無法被任何訊號終止,因為它正在等待核心 I/O 操作完成。這通常是 NFS 掛載失去連線、磁碟錯誤或驅動程式問題造成的,需要解決底層問題才能恢復 Q5: 使用 top/htop 時CPU百分比超過100% 這是多核心系統的正常現象。%CPU 欄位顯示的是「使用的 CPU 核心數的百分比」,在 4 核心系統中,單一進程最大可顯示 400% 在 top 中按 1 可切換為顯示各核心個別使用率 htop 預設即顯示各核心的條狀圖 ----------------------- 安全與最佳實務建議 ----------------------- 日常維運建議 1.安裝必要的監控工具 apt install htop lsof iotop btop 2.設定每日自動進程報告(cron) 編輯 crontab crontab -e 加入以下行(每天早上 9 點發送報告) 0 9 * * * ps aux --sort=-%cpu | head -20 | mail -s "Daily Process Report" admin@example.com 3.設定使用者進程數量限制(防止 fork bomb) # /etc/security/limits.conf username soft nproc 100 username hard nproc 200 ------------------ 安全注意事項 ------------------ 1.不要隨意終止系統進程:特別是 systemd、kthreadd、kworker 等核心執行緒 2.生產環境操作原則:先確認,再行動;優先使用 systemctl 管理服務;必要時先備份設定檔;記錄操作步驟 3.權限管理:避免以 root 執行不明程序;定期檢查異常權限的程序(SUID 位元);使用 sudo 限制權限 4.定期檢查:使用 ps aux 或 top 定期檢視有無不明進程;注意名稱偽裝的惡意進程 (如偽裝成系統服務) ----------------- 效能優化建議 ----------------- 1.調整 Nice 值 (影響CPU排程優先級) 降低背景任務優先級 (正值 = 低優先) renice +10 -p PID 提高重要服務優先級 (需 root,負值 = 高優先) renice -5 -p PID 啟動時就設定 nice 值 nice -n 10 command 2.設定CPU親和性 (綁定程序到特定CPU核心) 將 PID 綁定到 CPU 0 和 1 taskset -c 0,1 -p PID 啟動時就綁定 taskset -c 0 command 3.使用 cgroups 限制資源 (透過 systemd) 以限制的資源啟動指令 (CPU 最多 50%,記憶體最多 1G) systemd-run --scope -p CPUQuota=50% -p MemoryMax=1G command 建議:在 Debian 13 中,systemd 已整合 cgroups v2,可以透過 systemctl set-property 命令為服務設定資源限制,這是現代Linux系統推薦的資源控制方式 ---------------------- 學習資源與延伸閱讀 ---------------------- man 手冊頁 ps 完整文件 man ps top 完整文件 man top htop 完整文件 man htop kill 訊號說明 man kill Linux訊號完整列表 man signal /proc 虛擬檔案系統說明 man proc 系統文件 /usr/share/doc/ 目錄下各工具的完整說明文件 /proc 目錄:每個子目錄對應一個進程,包含進程的所有狀態資訊 延伸工具 strace:追蹤進程的系統呼叫 (system call),適合深入除錯 ltrace:追蹤進程的函式庫呼叫 (library call) perf:Linux效能分析工具,支援CPU熱點分析、效能計數器 valgrind:記憶體洩漏與錯誤偵測工具 (主要用於開發階段) atop:類似 top 但支援記錄歷史數據,可回溯分析 進階監控系統 Prometheus + Grafana:企業級指標收集與視覺化平台 Netdata:即時效能監控,安裝簡單,介面直觀 Zabbix / Nagios:傳統企業監控解決方案,支援告警通知
-
Debian 13 從核心層面徹底停用 IPv6 ------ 前言 ------ 雖然 IPv6 是未來的網路通訊協定趨勢,但在某些特定場景下,我們可能希望完全關閉 IPv6 功能。常見的應用情境包括: 網路故障排查:釐清問題是否與 IPv6 相關 老舊應用程式相容性:部分舊版軟體對 IPv6 支援不佳 安全性考量:減少網路攻擊面,簡化網路堆疊 資源受限環境:降低系統負載,避免不必要的網路流量 對於 Debian 13 用戶而言,單純透過系統設定「關閉」IPv6 並不夠徹底 本文將從核心引導參數著手,讓 IPv6 協定棧在系統啟動初期就完全停用,從根源杜絕任何 IPv6 流量的產生 ----------------------------- 為什麼要從核心層面停用? ----------------------------- 常見的停用方法 (如調整 sysctl 參數) 雖然有效,但存在一個時間窗口:這些設定在系統啟動後的階段才生效 這意味著在參數應用之前,核心的 IPv6 模組已經載入,可能會產生短暫的 IPv6 流量,如鄰居發現 (Neighbor Discovery)、路由器請求 (Router Advertisement) 等流量 透過核心參數 ipv6.disable=1,可以直接命令核心不初始化 IPv6 子系統,這才是真正意義上的完全關閉 ------------------ 安全性提醒 ------------------ 停用 IPv6 可能影響某些雲端服務或 CDN (如 Cloudflare、Google),建議先確認應用場景是否允許 --------------------------- 修改 GRUB 核心啟動參數 --------------------------- 使用 root 權限開啟 GRUB 設定檔 vi /etc/default/grub 修改核心啟動參數 在檔案中找到 GRUB_CMDLINE_LINUX_DEFAULT 這行,通常預設如下: GRUB_CMDLINE_LINUX_DEFAULT="quiet" 在引號內追加參數 ipv6.disable=1,修改後應如下: GRUB_CMDLINE_LINUX_DEFAULT="quiet ipv6.disable=1" 重要提醒: 如果該行中原本有其他參數 (如 splash、net.ifnames=0 等),請務必保留它們,只需在末尾加入 ipv6.disable=1,並用空格與前面的參數隔開 儲存檔案並離開編輯器 按 Esc,輸入 :wq 後按 Enter ----------------- 更新GRUB配置 ----------------- 執行以下指令,使修改生效: update-grub 成功執行後,應看到類似 Found linux image: ... 的輸出,且沒有錯誤訊息 --------- 重開機 --------- 核心參數的變更需要重啟才能生效 reboot -------------- 驗證與排查 -------------- 確認核心參數已套用 重開機後執行 cat /proc/cmdline 應包含:ipv6.disable=1 若沒有出現,表示 GRUB 未成功更新 重開機後,檢查 IPv6 位址是否存在 ip a | grep inet6 沒有任何輸出 或只看到 ::1 (IPv6 的 loopback 位址,在極少數情況下可能仍有顯示) 通常表示已成功停用 測試 IPv6 連線 ping6 google.com 預期結果應顯示:connect: Network is unreachable 檢查核心設定 grep CONFIG_IPV6 /boot/config-$(uname -r) 輸出 CONFIG_IPV6=y 是正常的,這表示 IPv6 是編譯進核心而非模組,我們只能「停用」而非「移除」它 確認核心是否接受停用指令 cat /proc/sys/net/ipv6/conf/all/disable_ipv6 返回 1:完美,IPv6 已停用 返回 0:停用失敗,請檢查 GRUB 設定是否有拼寫錯誤,或是否有其他服務 (如 systemd-networkd) 覆蓋了核心設定 ------------------ 終極驗證方式 ------------------ 指令 sysctl net.ipv6.conf.all.disable_ipv6 若出現以下訊息,代表 IPv6 子系統真的完全不存在了: sysctl: cannot stat /proc/sys/net/ipv6/conf/all/disable_ipv6: No such file or directory 即使核心停用了IPv6,某些應用程式 (如 curl、wget) 或服務在解析DNS時,仍可能會因為 glibc 的位址選擇規則而產生短暫的IPv6連線嘗試 雖然此時網路層會直接拒絕,但為了追求極致純淨,建議額外進行以下操作 編輯 /etc/gai.conf vi /etc/gai.conf 這個檔案控制了位址解析的優先權。找到如下行並取消註釋,告訴系統優先使用IPv4映射位址: 找到下面這一行,去掉前面的 '#' 號 precedence ::ffff:0:0/96 100 儲存檔案並離開編輯器 按 Esc,輸入 :wq 後按 Enter ------- 補充 ------- 後續優化設定 即使核心層面已停用 IPv6,某些應用程式或服務仍可能嘗試使用 IPv6,導致延遲或日誌錯誤。以下提供幾個補充設定,讓系統更純淨 ---------------------------- SSH伺服器的「監聽限制」 ---------------------------- 許多SSH設定預設會監聽 any (包含 v4/v6)。雖然核心關閉了,但建議明確指定IPv4協議 編輯 /etc/ssh/sshd_config vi /etc/ssh/sshd_config 找到 #AddressFamily any 這行,取消註解並修改為 AddressFamily inet 儲存檔案並離開編輯器 按 Esc,輸入 :wq 後按 Enter 重新啟動SSH服務 systemctl restart ssh 驗證SSH服務狀態是否正常 systemctl status ssh ---------------------------- 清理 /etc/hosts 檔案 ---------------------------- /etc/hosts 通常包含 ::1 localhost 的條目,雖然不影響網路流量,但某些應用程式會優先嘗試解析 IPv6 位址而導致延遲 編輯 hosts 檔案 vi /etc/hosts 將含有 ::1 的行刪除或加上註解 # ::1 localhost ip6-localhost ip6-loopback # ff02::1 ip6-allnodes # ff02::2 ip6-allrouters 儲存檔案並離開編輯器 按 Esc,輸入 :wq 後按 Enter --------------------- 強制 APT 使用 IPv4 --------------------- 避免 APT 在更新時嘗試連接 IPv6 鏡像站 echo 'Acquire::ForceIPv4 "true";' | sudo tee /etc/apt/apt.conf.d/99force-ipv4 確認設定已寫入 cat /etc/apt/apt.conf.d/99force-ipv4 ---------------------------- 黑名單IPv6模組 (進階保護) ---------------------------- 建立模組黑名單檔案 vi /etc/modprobe.d/blacklist-ipv6.conf 加入以下內容 blacklist ipv6 儲存檔案並離開編輯器 按 Esc,輸入 :wq 後按 Enter 儲存後,更新 initramfs 使黑名單在開機時生效 update-initramfs -u ----------------- 封包監聽驗證 ----------------- 安裝 apt install tcpdump -y 使用 tcpdump 監聽所有介面的 IPv6 封包 tcpdump -i any ip6 正常情況下應沒有任何封包輸出 若在 VPS/雲主機 上仍看到 IPv6 封包,可能是由以下原因造成: Hypervisor 層級注入的封包 Host bridge 發送的封包 主機商網路層送入的封包 這些情況並非主機內部問題,無需擔心 ----------------- 常見問題與排除 ----------------- Q1:為什麼修改 GRUB 後 IPv6 沒有關閉? 可能原因: GRUB 設定檔拼寫錯誤 (如 ipv6.disable=1 誤寫為 ipv6.disable=0) 忘記執行 update-grub 更新設定 有其他服務 (如 NetworkManager、systemd-networkd) 覆蓋了核心設定 Q2:關閉 IPv6 會影響系統正常運作嗎? 一般不會。大多數應用程式在 IPv6 不可用時會優雅地降級使用 IPv4。但如果某些服務強制依賴 IPv6,可能會出現異常,此時建議保留 IPv6
-
firewall.sh # ========================== 使用者設定區塊 ========================== # # ⚠️ 警告:修改前請務必閱讀註解,確認管理 IP 已正確設定(含 IPv6) # 1. 禁止連線的 IP 或網段(支援 IPv4 與 IPv6) # 範例:BADIPS="198.108.0.0/16 203.0.113.0/24 2001:db8::/32" BADIPS="" # 2. 不可能出現的私有 IP(RFC 1918 / 私有 IPv6) # ⚠️ 注意:若您的伺服器本身 IP 屬於以下網段,請務必移除對應項目! # 10.0.0.0/8 → 大型企業內網(AWS、Hetzner 等雲端內網請注意) # 172.16.0.0/12 → 中型企業內網(Docker 預設網段也在這範圍) # 192.168.0.0/16→ 小型辦公室/家庭網路 # fc00::/7 → IPv6 唯一本地位址(等同 IPv4 私有網段) IMPOSSIBLE_IPS="10.0.0.0/8 172.16.0.0/12 192.168.0.0/16 fc00::/7" # 3. 允許對內連線的 TCP 通訊埠(支援來源 IP 限制與反向排除) # 格式說明: # - 單一埠:22 # - 連續埠:7000:7009 # - 指定來源 IPv4:22,192.168.1.100 # - 指定來源 IPv6:22,2001:db8::1 # - 反向排除(禁止特定 IP):22,!192.168.1.100 # # ⚠️ 重要:請將以下 IP 換成您當前連線的管理 IP! IN_TCP_PORTALLOWED="22,你的管理員IPv4 22,你的管理員IPv6 80 443"